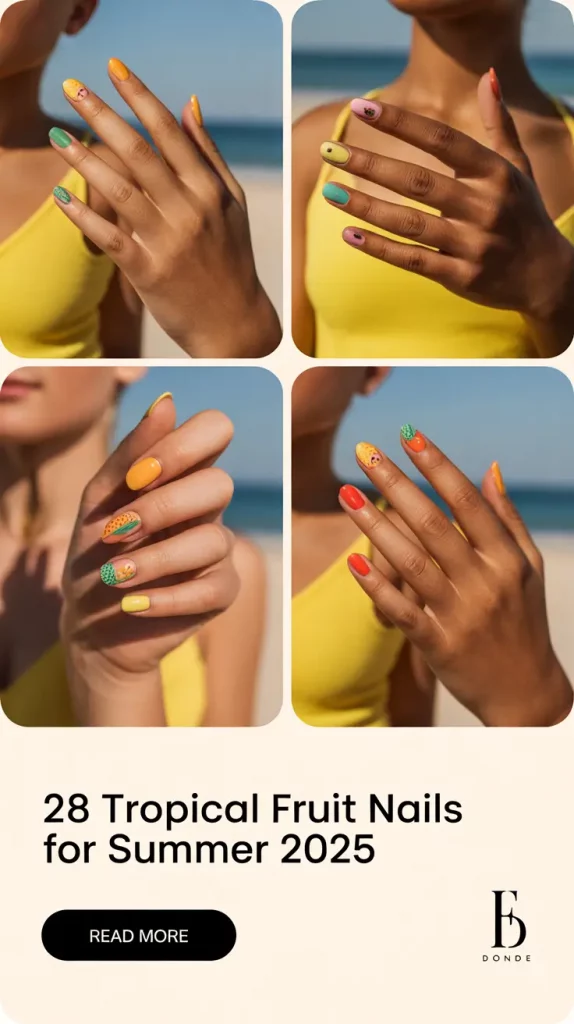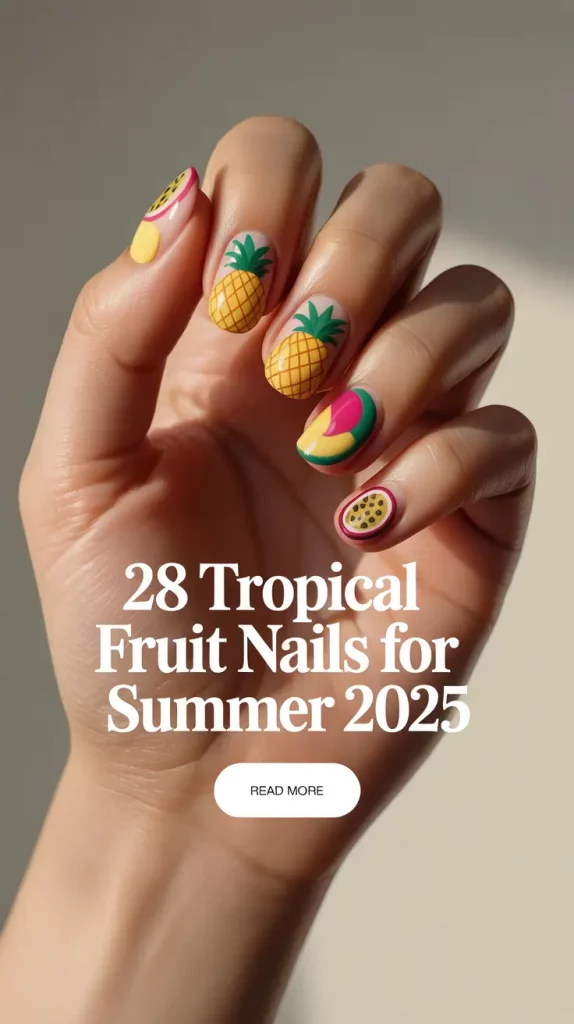
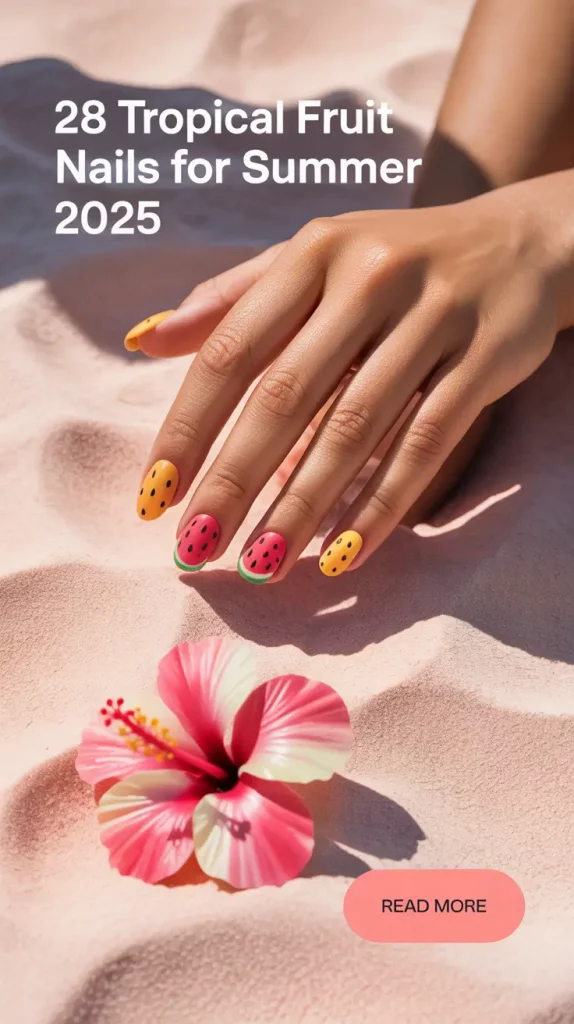
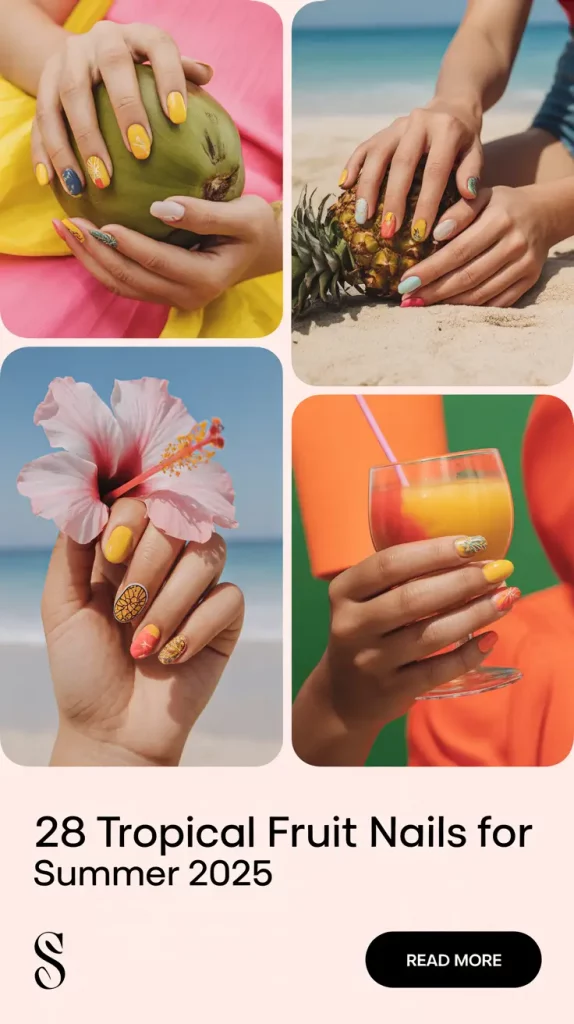
Summer’s here, and your nails are about to steal the spotlight. If your go-to mani is still stuck on safe neutrals or standard reds, it might be time to shake things up—like, tropical fruit cocktail level shaken. So here’s a juicy question: what if your manicure could feel like a mini-vacation? The kind that says “I’ve got my toes in the sand and a drink in hand,” even if you’re just heading to Trader Joe’s. In this post, we’re diving into a zesty trend that’s been quietly dominating my Pinterest boards and Insta saves: tropical fruit nails. They’re playful, bold, and, honestly, kind of irresistible.
From papaya slices to glossy watermelon wedges, these nails aren’t just designs—they’re summer statements. Let’s explore the delicious world of fruit-inspired nail art, one design at a time. Ready to dip into your next favorite mani?
Flamingo Pink Meets Tropical Juice
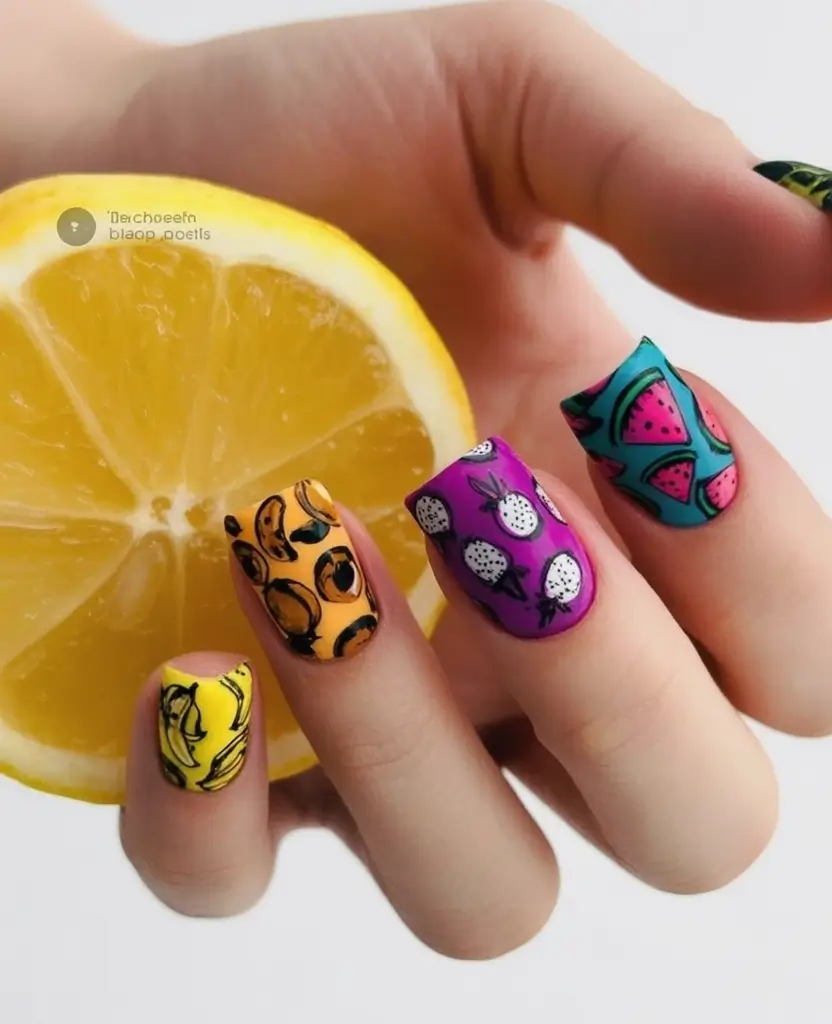
There’s something totally hypnotizing about this blend of watermelon art, matte magentas, and that dreamy papaya-punch thumb. It’s like a Balinese smoothie bowl collided with Y2K vibes—and I’m into it. The nails stretch into bold, almond and stiletto tips, with each nail getting its moment. One finger flaunts a glossy, textured watermelon slice, complete with black seeds and a juicy green rind. Another stands out with papaya skin fading into yellow and black speckles. But the showstopper? That pink flamingo aura paired with cloud-like swirls and gold lettering. Pure tropical vacation nails fruit Art energy.
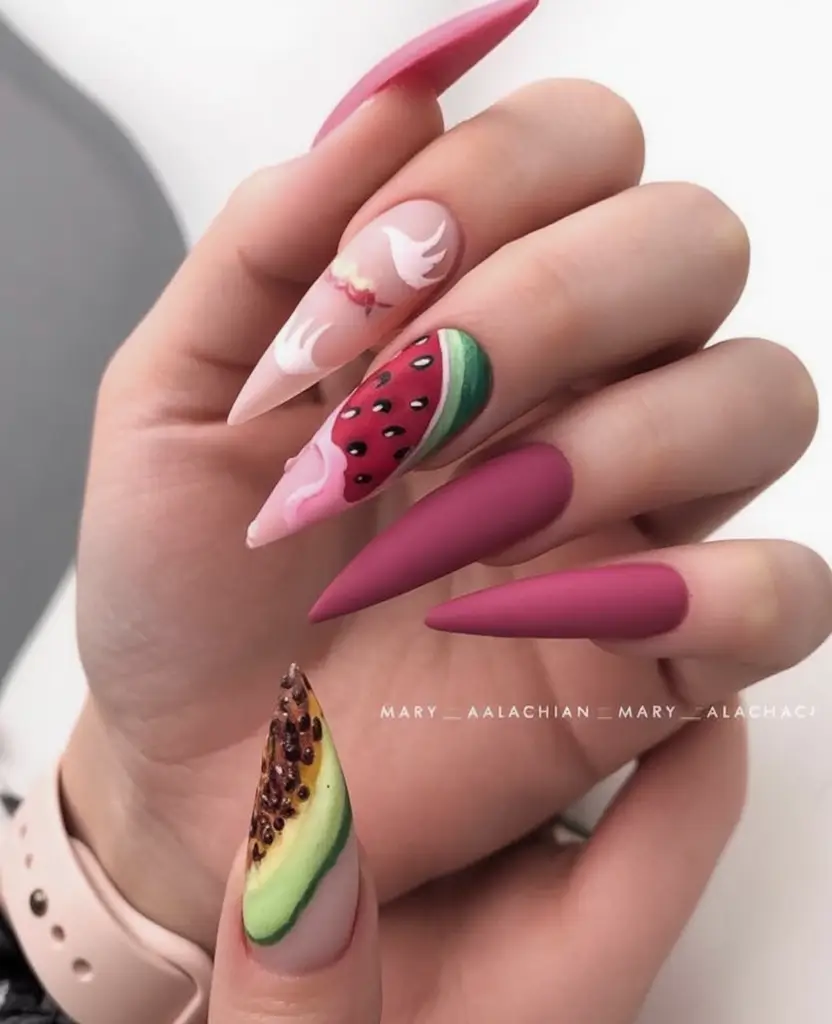
To recreate this set, you’ll need a few different finishes: ultra-glossy topcoat for the fruit art, high-quality matte polish (like OPI’s “Mad for Madness Sake”) for the bold solids, and a precision brush for the fine detailing. Gel polish will give you the juicy dimension, especially for the 3D seed and rind textures. Brands like Born Pretty and Modelones offer sculpting gels perfect for that tropical pulp effect.
While this look is definitely on the “extra” side, don’t stress if you’re not a pro. Start with press-ons or recreate one or two statement nails using decals or stamping plates. For hand-painting, layer your fruit tones gradually—building the base color first, then using thin brushes for seeds and contours. According to celeb manicurist Tom Bachik, “Layering and curing in stages helps you control detail without smudging your design.” And trust me, it makes a world of difference.
I wore a simplified version of this look last summer to a rooftop brunch in Santa Monica, and I lost count of how many people asked me where I got them done. It’s fun, it’s flashy, and it’s surprisingly wearable. If you want your nails to scream “I’m in vacation mode,” this one delivers.
Sweet Papaya on Barely-There Nude
This one’s for the girls who love Designs that feel a little bit flirty but still minimal. Here, a short almond shape is the base for sheer blush polish and fruit-forward artwork that looks straight out of a tropical farmers’ market. The papaya illustrations are so vivid, you can practically smell the sun-ripened sweetness. Nestled on two accent nails, the fruit details pop with shades of tangerine, lemon, lime, and tiny black seeds. The rest of the nails are clean, soft, and glowy—ideal for beach weddings or just sipping iced lattes in June.

To achieve this tropical fruit nails look, start with a natural-toned gel base like Essie’s “Sheer Luck” or Zoya’s “Bela.” For the fruits, use a thin detailing brush and a mix of citrus shades—think Butter London’s “Yummy Mummy” for nude, Sally Hansen’s “Sunkissed” for papaya, and a vibrant green liner gel for the rind. Dotting tools will help mimic those tiny seeds with more control than a brush.
Honestly, this is one of the more wearable tropical sets I’ve seen. It bridges the gap between neutral and bold without losing any personality. You can definitely do this at home, especially if you prep your base with a ridge-filler and use stickers or decals if hand-painting feels intimidating. According to Allure’s nail trend forecasts, designs that combine fruit and minimalist lines are “the sweet spot for 2025”—and I get why.
I had something super similar last summer for a friend’s baby shower. It felt feminine but still fun enough to show off in photos. And bonus: they match with practically everything in your summer closet.
Sunset Ombré with a Papaya Pop
Let’s talk drama. These squared-off coffin nails serve sunset glam with a hit of papaya realism. The ombré gradient flows from warm coral to neon citrus—hello, Miami heat. But then we zoom in: one nail is devoted entirely to an ultra-detailed, almost neon papaya half, decked out with lush seeds and 3D juice droplet accents. Even the art is elevated with tiny gemstones and leaf-like swirls. It’s the kind of nail Art that whispers, “I spent a week in Tulum” without saying a word.
![]()
I’d use high-pigment polishes like Gelish’s “Tiger Blossom” and “Lime All The Time” to build the ombré. For the fruit, you’ll need colored builder gel or 3D gel paint for that bouncy, pulp-like texture. Dotting tools and a steady hand are key to getting the seed layout clean. Finish with rhinestones and a no-wipe gloss top coat to make it all pop.
This manicure’s not for the faint of heart, but if you’re craving nails that make people stop and ask questions, this is your moment. You can simplify it by doing the papaya detail on just one nail and using ready-made fruit decals or stickers for the rest. Just don’t skip the topcoat—it’s what makes everything look professional.
These nails remind me of golden hour. You know that feeling when the sun’s low, your skin’s warm, and your only plan is dancing barefoot to summer playlists? That’s this manicure, bottled.
Papaya Paradise in Neon Lime
Talk about bold. This look is like wearing a piña colada on your fingertips—with extra papaya. The electric lime green polish is a scene-stealer on its own, but add in those tropical fruit accents, and we’re officially in resort mode. Each accent nail showcases half a papaya outlined in leafy greens and detailed with precision. The black seed clusters and golden-orange centers give it a sweet-and-sassy finish. This one screams tropical vacation nails fruit Designs from head to toe.
To recreate this, go for a neon base like ORLY’s “Glowstick” or Cirque Colors’ “Kushy.” For the artwork, a set of fine detailing brushes and vibrant gel pots will be your best friends. Leaf detailing around the fruit makes the look feel more botanical and balanced. Use glossy builder gel to create the smooth dome that gives the art its 3D edge.
This set is definitely best left to a pro unless you’re comfortable with gel polish and dotting work. But if you’re DIY-ing, try mixing neon press-ons with a few custom-painted tips. According to Elle’s 2025 nail predictions, neon greens are having a “main character” summer, and we’re seeing them everywhere—from swimsuits to eye shadow.
Personally, I’d rock these for a beach bachelorette or a vacation where I want my nails to be the main accessory. They photograph beautifully and give instant “sunshine in my soul” energy. Think of it as your mani saying, “I’m not just here—I’m thriving.”
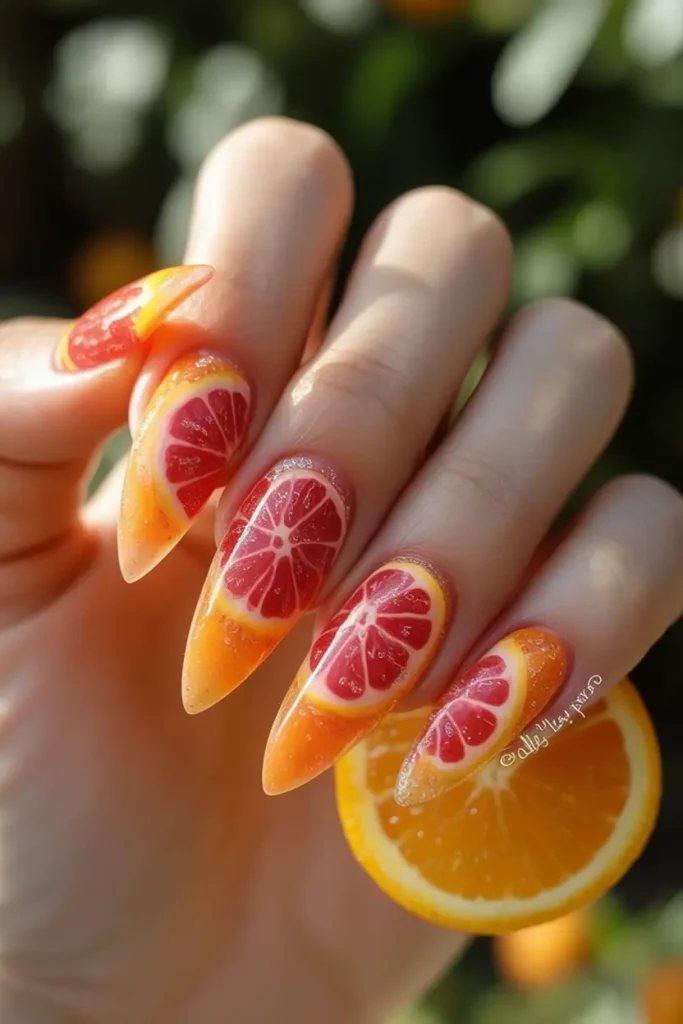
Glossy Grapefruit Glow
This manicure is a citrus lover’s dream come true. Grapefruit’s warm and juicy colors are highlighted by a high-gloss coral polish and a nail accented with a 3D grapefruit slice and some green leaves. The shape is oval, polished, and polished (yes, both meanings apply)—the kind of look that pairs beautifully with white linen dresses and frozen cocktails.
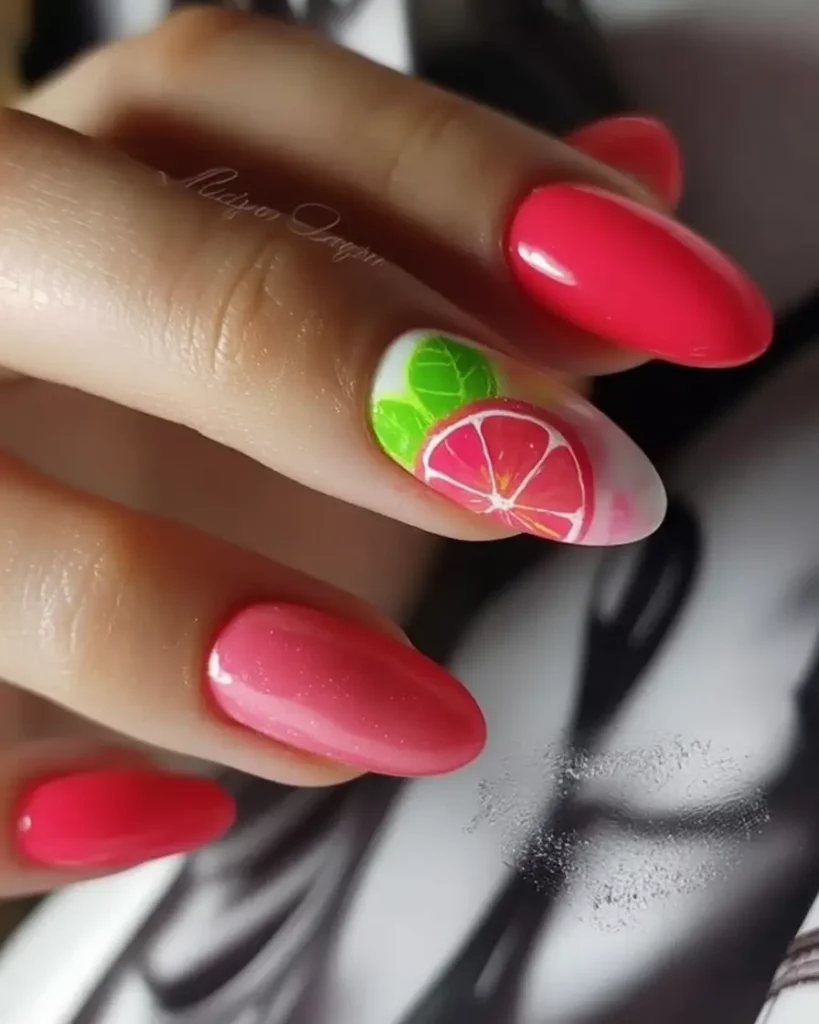
Try using a coral gel like CND Shellac in “Tropix” or Gelish “Rockin’ the Reef” to get this look. You can create 3D details using either acrylic sculpting gel or colored builder gel which will keep their shape. You can either use a silicone mold or a fine brush to shape the citrus wedges and veins. Use a top coat that adds extra shine such as Seche Vive or The GelBottle’s “Extreme Shine.”
Begin by painting two layers of your coral color on all your nails. First, make the background white, then draw the fruit wedges with light pink and add the shadows with dark coral. Dot the grapefruit pulp with a dotting tool and paint the white rind using a liner brush. Add topcoat last for that freshly sliced effect.
I took this manicure with me to Palm Springs over the weekend and my nails got more attention than my clothes. It’s a lot of fun, well-made and a bit cheeky—just like summer when it’s at its best.
Juicy Watermelon Garden
This set is soft, natural, and full of charm. The tropical fruit nails theme becomes fun with watermelon wedges showing up on nude nails. Some nails are painted with thick slices of black fruit and juicy color, but the rest are clean with speckled pink polish. The combination of empty space and colorful fruit makes this set look very stylish.

A good choice for a neutral base is “Ballet Slippers” from Essie or “Bubble Bath” from OPI. For the watermelon slices, you’ll want a bright magenta or fuchsia (try “Pompeii Purple” by OPI), paired with lime green and deep black gel liners. Cirque Colors’ “Halcyon” is a topcoat that gives your nails a summery freckled effect.
If you enjoy DIY, this set is straightforward to do at home. As soon as your nude is finished, add the watermelon wedges with a thin brush. First, fill in the bright pink area and then draw the green and white outline. Add the seeds to your design by using a toothpick or a dotting tool. Don’t skip the top coat to help your nail art last longer.
I really like how this look is both light and easy to put on. It doesn’t make a big deal but still shows it’s time for it. If neon nails aren’t your thing, this is the perfect option.
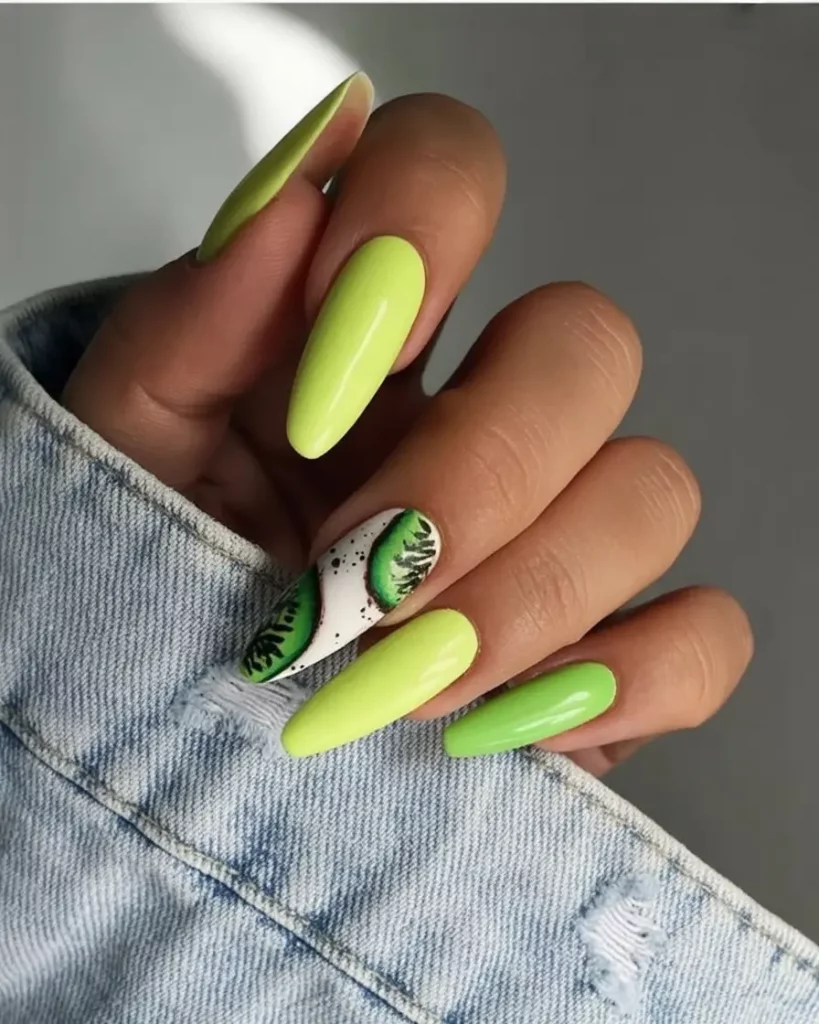
Kiwi Meets Pineapple Perfection
Now you can make a fruit basket look like a piece of fashion. They are long and almond-shaped, with sharp white, bright yellow and colorful fruit Art contrasts. The kiwi slice is painted with high-detail gel paint which includes dots for the seeds and a bright gradient of green. In addition, the pineapples use both illustration and 3D gold charms, adding a unique texture that stands out.
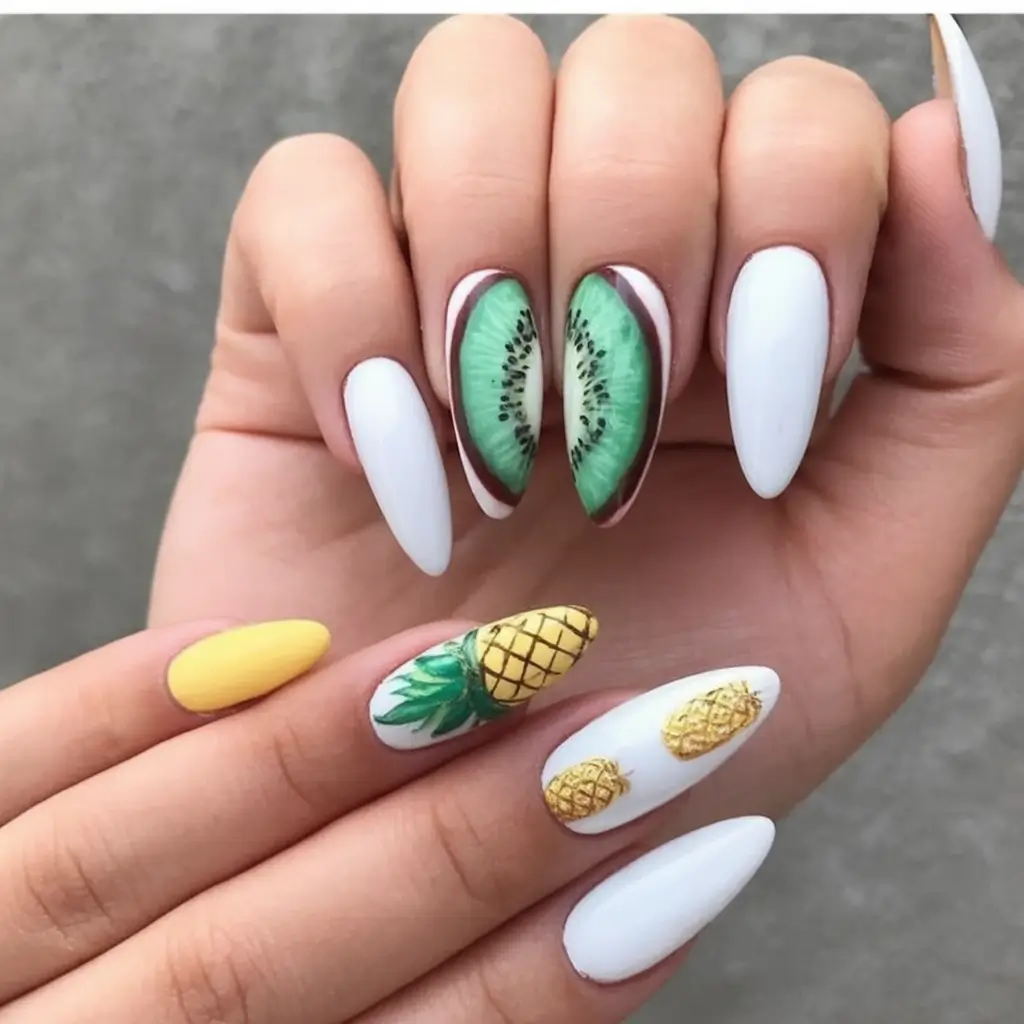
If you want to try this look, apply “Blanco” by Valentino Beauty Pure as your snow-white gel base. For the kiwi design, opt for layered greens (chartreuse, lime, emerald) with a small detailing brush. Pineapples can be painted by hand or decorated with tiny pineapple charms which can be bought at nail supply stores or in online kits.
If you’re trying this at home, do the kiwi first. Apply a light green gel to the center, then make circular gradients outward. Dot the tiny seeds with a black gel-filled dotting tool. For pineapple, trace the diamond pattern with gold and fill it in with yellow and brown. To finish, add charms on top of the uncured gel, let it cure and topcoat the design.
This set makes you feel like you’re in a poolside cabana right away. It’s bright, lively and personal—just like the vacation you’re excited to post about before you even leave.
Pineapple Pop with a Graphic Twist
This one had me hooked at first glance. The turquoise background looks great with the rich yellow pineapples. Include the graphic black-and-white stripes and it looks like you’re wearing a designer nail design. The Designs set stands out because every fruit is framed by a chevron or diagonal stripe pattern which brings order to the colorful chaos.
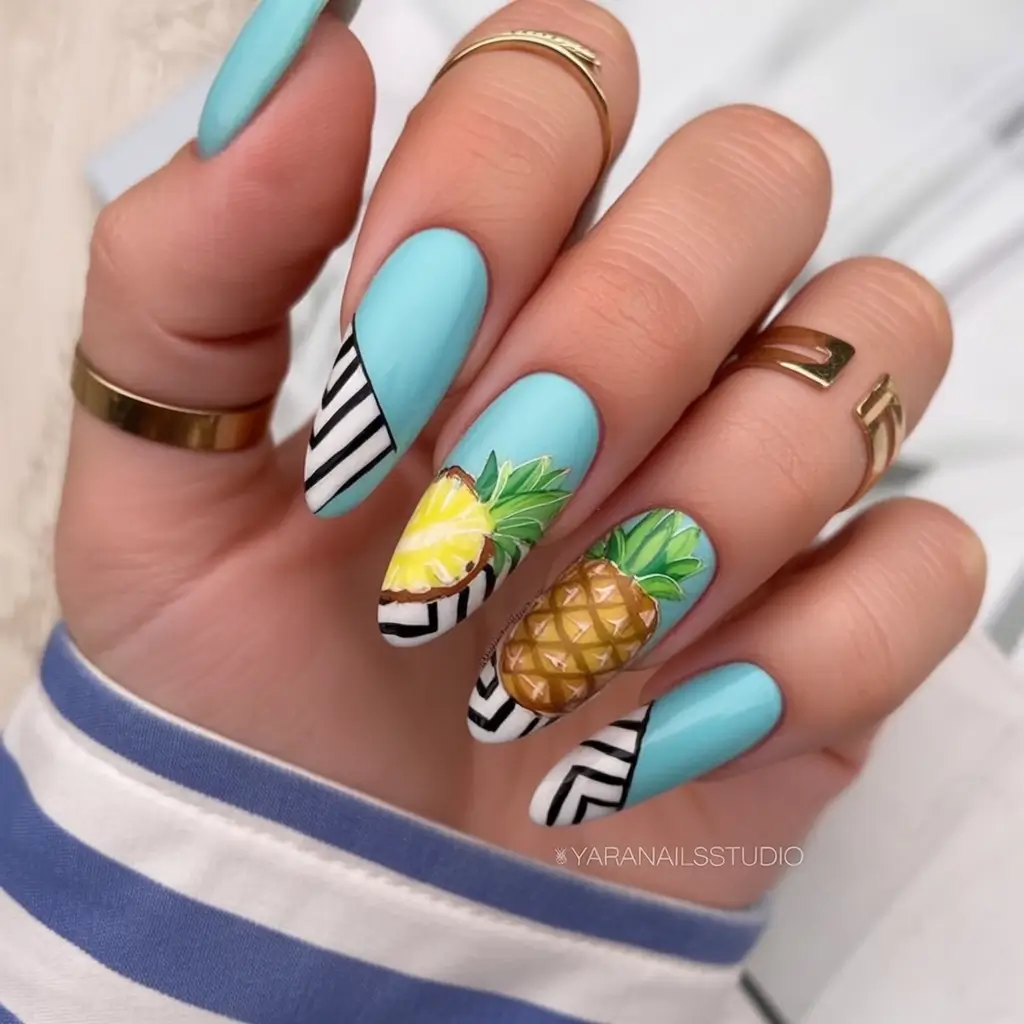
A great way to start with color is using a sky blue gel polish such as “Blue Lagoon” from Kiara Sky or “Saltwater Happy” from Essie. The pineapples require layering yellow, gold, and brown (try using The GelBottle’s “Daisy” and “Butternut”). To achieve those bold lines in black and white, use striping tape or a stamping plate for your graphics.
You should start by painting the base with blue. Use striping tape to make your design, paint the black and white stripes and remove the tape while it is still wet. Draw a basic outline for the pineapple and add details with darker colors to give it depth. Top everything with a high-gloss gel topcoat.
Honestly? I’m obsessed. It’s like tropical nails met editorial fashion week. I can see myself wearing these to a wedding or to make a plain outfit look more special. It’s bold, smart, and bursting with flavor.
Bold Dragon Fruit Statement
Let’s close this batch with a showstopper. These nails look like summer with their bold hot pink, but the dragon fruit artwork turns them into real tropical vacation nails. There are many interesting details in the fruit—white pulp with seeds, surrounded by lime green flames, all against a hot pink background. It’s both daring and fun and I enjoy it from start to finish.
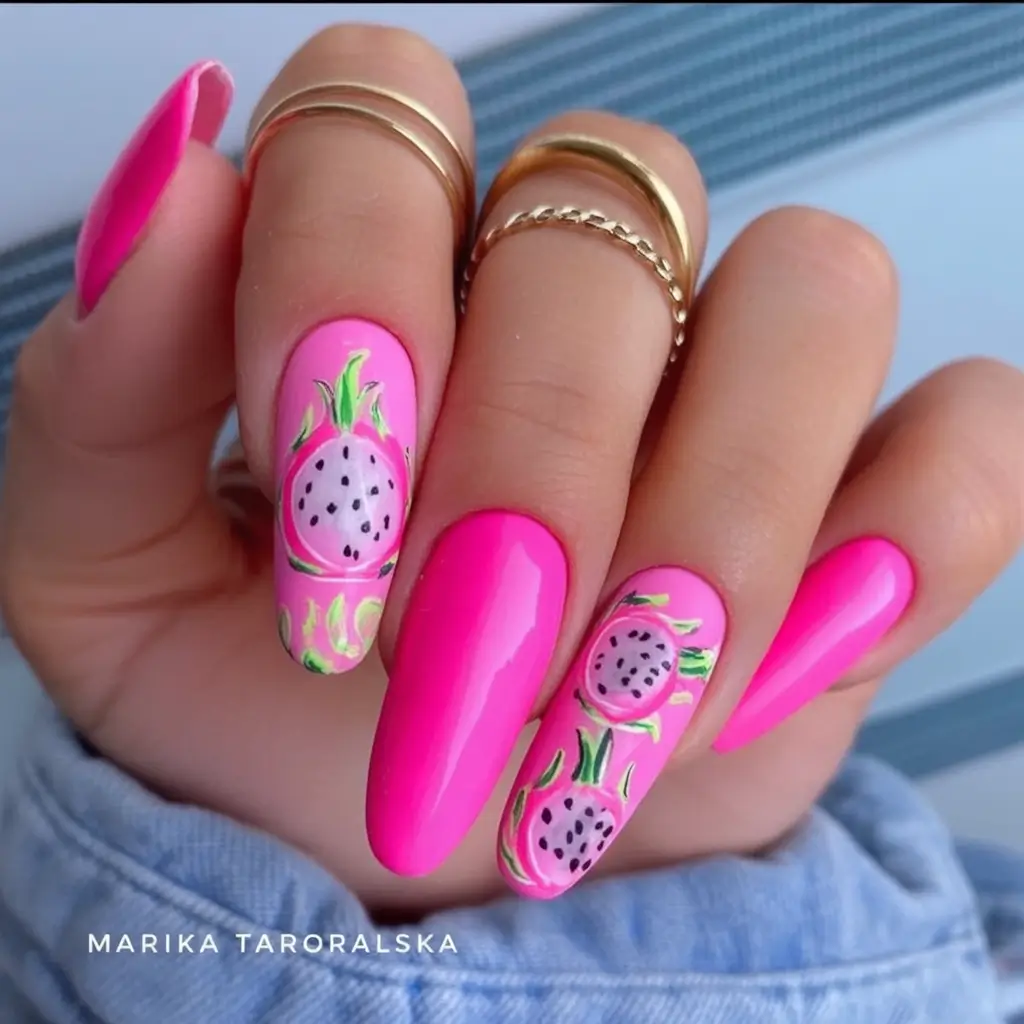
The key polish here is the electric pink. My votes go to Madam Glam’s “Pink Fireworks” and Beetles Gel’s “Hot Pink.” The dragon fruit effect is made by applying a white gel for the flesh and a green gel along the fruit’s edges. Make sure to use plenty of black seed dots, as they make the dish special.
If you’re attempting this at home, focus on contrast. Put on your pink base and then draw a rough circle or oval using white. Layer in the green outline and black dots last. If drawing the design yourself seems too complicated, you can use decals or stickers instead.
There’s something seriously empowering about this look. It’s flavorful, bold and gives you an exciting sugar rush. I’d rock this for a girls’ trip, a beach day, or any moment I want to feel unapologetically loud—in the most fabulous way possible.
Banana Milkshake Pop
If there was ever a manicure that felt like brunch with your besties at a retro diner, it’s this. Matte pastel yellow steals the show on most nails, but the banana-print accents on a crisp white background are what make this look pure sunshine in Designs form. The shape is natural round-oval, and the vibe is peak feel-good—chic, a little cheeky, and ridiculously wearable.
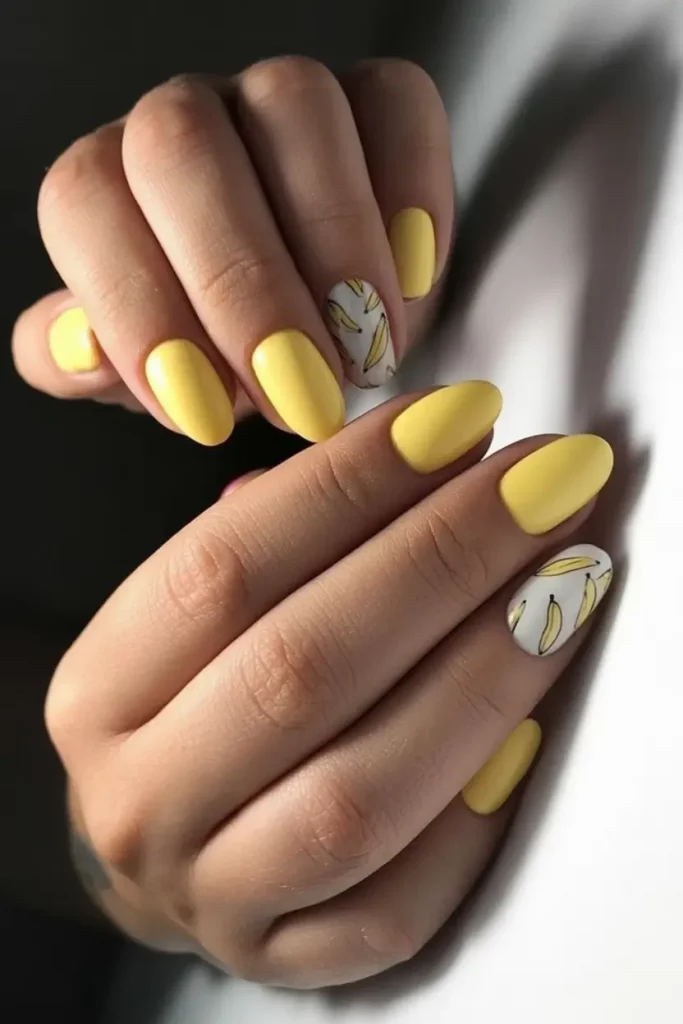
For the yellow, I love using “Alpine Lemon” from Madam Glam or “Banana Cream” by ILNP. To get that matte finish, don’t forget a velvet topcoat like Velvet Matte by OPI. For the banana art, a nail stamping kit with fruit patterns can help, or you can go freehand with a micro brush and gel liners in golden yellow and chocolate brown.
It’s one of the easiest tropical fruit manis to recreate at home—just do all your nails in yellow and save the accent finger for the banana print. Lay down a white base, sketch a few boomerang shapes, and fill them in with sunny tones. Trust me, even if you mess up a bit, it still turns out cute. And that’s kind of the point.
I wore something similar last August for a backyard picnic, and I still remember a stranger asking me if my nails were “banana decals or real art?” I guess the answer is both, in spirit.
Neon Fruit Fantasy Fade
This one is the technicolor dream you didn’t know your hands needed. A five-color fade across almond-shaped nails, each shade melting into white at the base, like a melted sorbet. Then—bam—black seed-like flecks decorate each nail, turning this design into a playful tribute to tropical treats like papaya, pitaya, and even guava.

The colors you’ll want are neon brights with a jelly or semi-translucent finish: think Lime Crime’s “Cosmic” or Cirque Colors “Electric Daisy.” Blend each into a soft milky white using a sponge or gel ombré brush. For the seed accents, a black liner or dotting tool is essential.
You don’t need to overthink the process. Do the gradient by sponging on your bright color first, then gently dab white over the base area. Once dry or cured, apply random seed shapes with a dotting tool, cure again, and seal with a clear topcoat.
This is one of those sets that gives full “Coachella meets Copacabana” vibes. I can imagine wearing these with neon swimsuits, sunset cocktails, and late-night dancing on hotel rooftops. It’s fruit-forward without picking favorites.
Fiery Papaya with a Side of Drip
Okay, let’s talk high drama. This long square manicure makes a fiery entrance with flaming orange and red shades, then cools things down with a single accent nail showcasing an ultra-vivid papaya design. Bonus points for the milky white nail topped with dripping lava-red gel polish—it feels juicy and fiery all at once, like a summer bonfire cocktail.
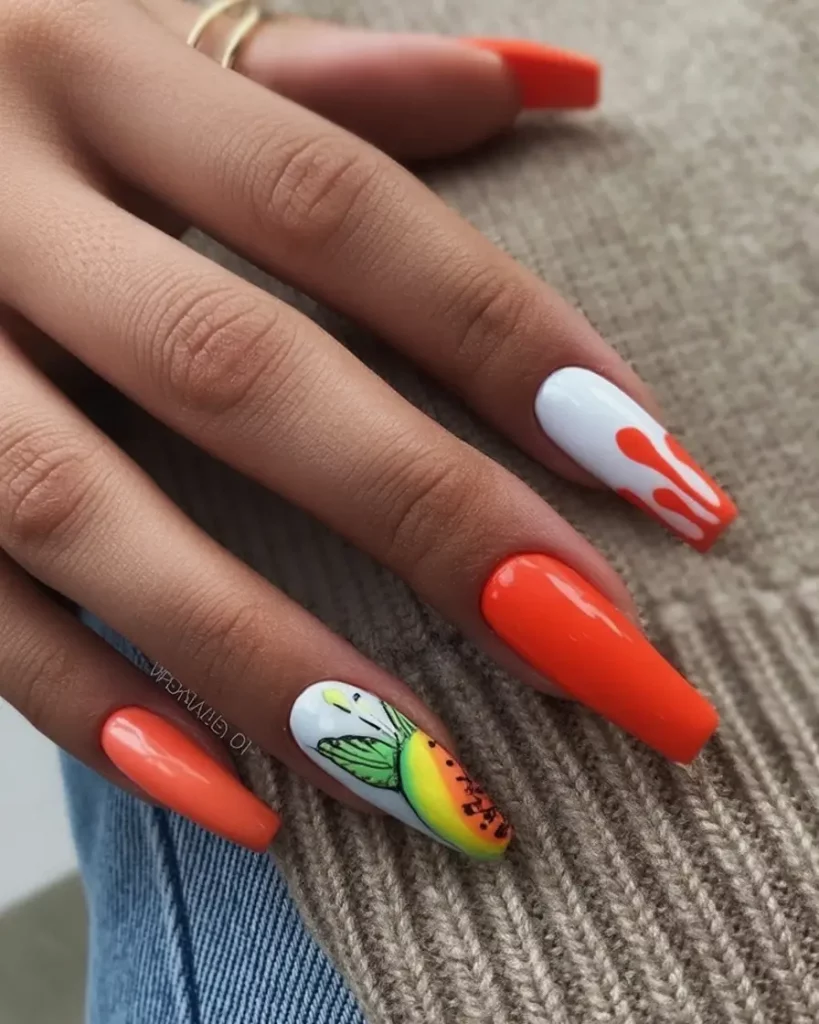
The base color here should be something like “Tangerine Burst” by Gelish or “Hot Flame” by Bluesky. The accent nail will need layering: use white gel first, then sketch the papaya slice with burnt orange, yellow, and black. A 3D gel for the seeds can take it next level.
When doing the drip design, apply your white polish and let it cure. Then add drops of red gel from the cuticle area and drag down with a detail brush. Cure immediately to keep the texture. The papaya design benefits from a layered paint approach: light colors first, then build depth with shading and micro-detailing.
This is what I call a power manicure. It’s bold, unapologetic, and bursting with fruit Art flair. Not for the shy types—and that’s what makes it so fun.
Cool Kiwi in Lemon-Lime
Here’s the citrusy calm after the heat wave: cool, fresh lime green paired with a delicate kiwi half painted across a single accent nail. It’s modern, clean, and wildly effective. The medium almond shape keeps it elegant, while the bright green gives it a flirtatious, sorbet-like appeal.
Try “Limeade” by Bio Seaweed Gel or “Wasabi” by Zoya for that signature green base. For the kiwi, you’ll need gel polish in white, two greens (light and forest), and a fine brush for the black seeds and edge detailing. A matte or gloss finish both work depending on your taste.
For a clean kiwi nail, prep your white base, then lightly sponge a gradient of greens toward the center. Draw tiny seeds with a micro dotting tool, and outline the fruit with a steady hand. Top with gloss to give it that just-sliced shine.
This one gives me summer smoothie energy in the best way. I wore a similar set while road-tripping down the Pacific Coast and it was the perfect mix of low-maintenance and high-impact.
Banana Jungle on Mint Green
Now this is a full-on fashion moment. These matte mint green nails alternate with graphic banana prints that feel like Warhol meets nail salon. The long almond shape gives this set elegance, while the bananas keep it quirky and bright. If tropical vacation nails fruit Designs had a minimalist high-fashion cousin, this would be it.
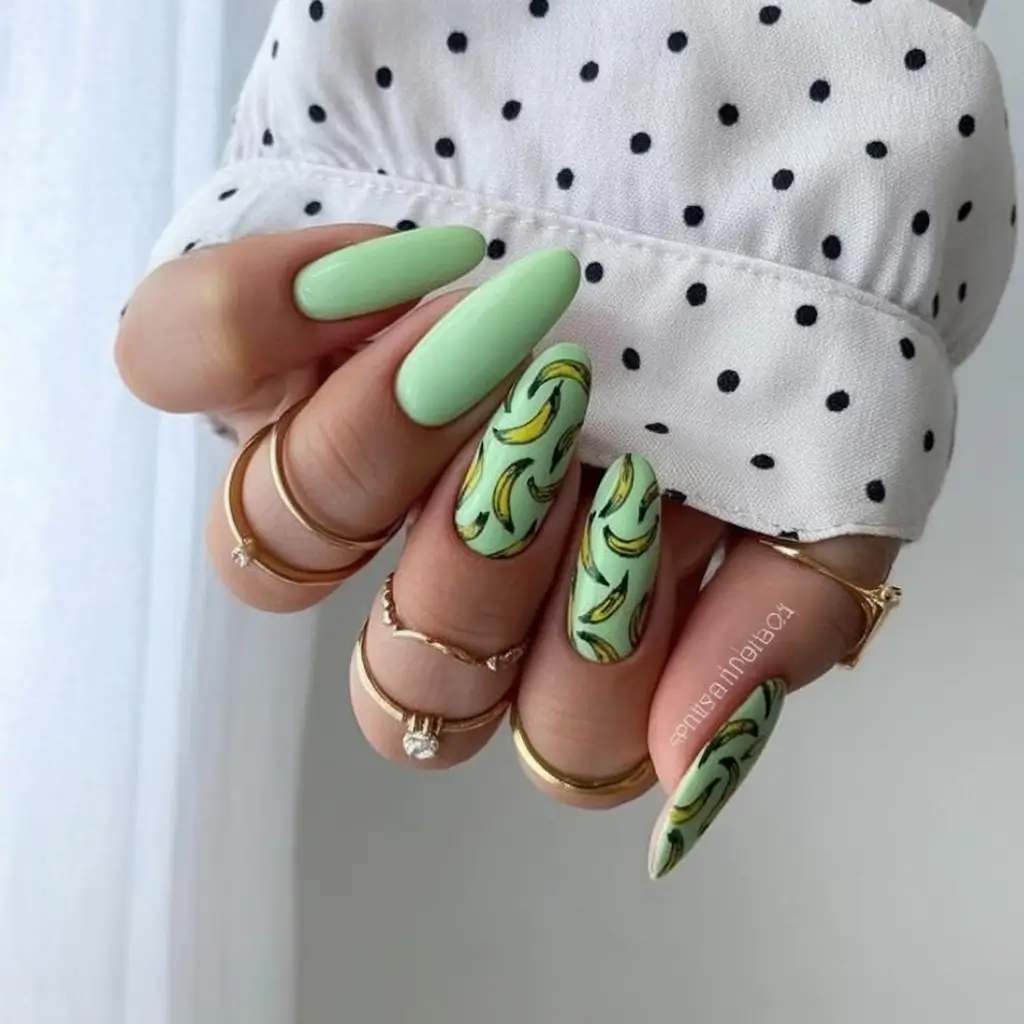
For the mint base, I recommend “Mint Condition” by ILNP or “Cucumber Cooler” by Lights Lacquer. The banana art is best done with stamping or hand-painting using a yellow liner gel and black detailing. Top with a velvet matte topcoat to finish.
You can paint this look by alternating solid mint nails with banana-themed ones. Use a pale mint background, sketch in little bananas, and shade each one for dimension. A matte topcoat pulls it all together into a runway-worthy look.
I’d totally wear this with a flowy shirt dress and oversized sunnies. It’s the kind of design that looks expensive, even when it’s not. A statement, but a soft one.
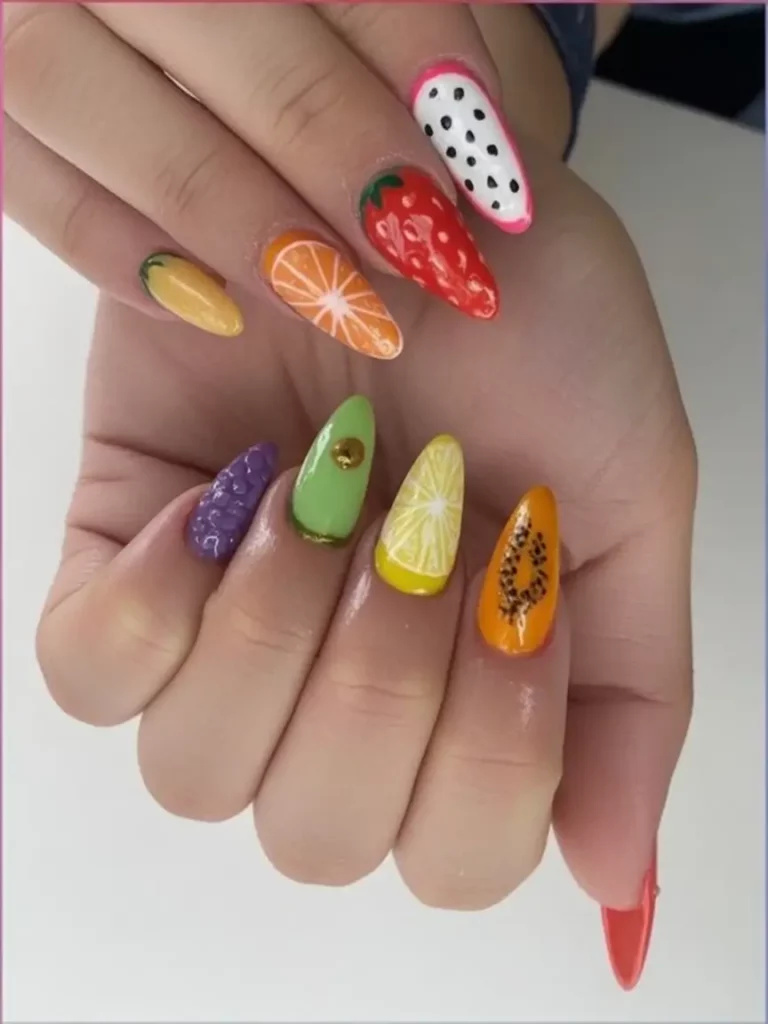
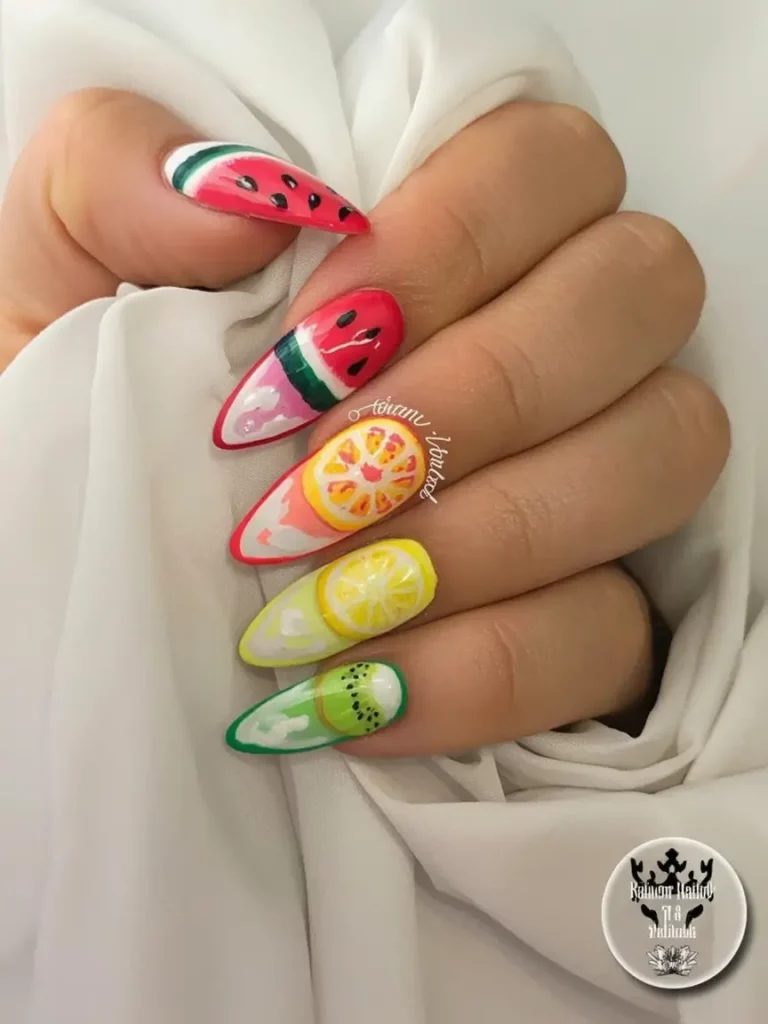
Fruit Salad Remix
This look is an entire smoothie bar on your fingertips. Each nail features a different pastel base and a different fruit—kiwi, dragon fruit, banana, papaya, watermelon—all rendered in a charming, comic-book style. The almond shape adds elegance to the otherwise playful vibe, and the matte finish keeps it feeling modern. If summer had a playlist, this set would be the album cover.
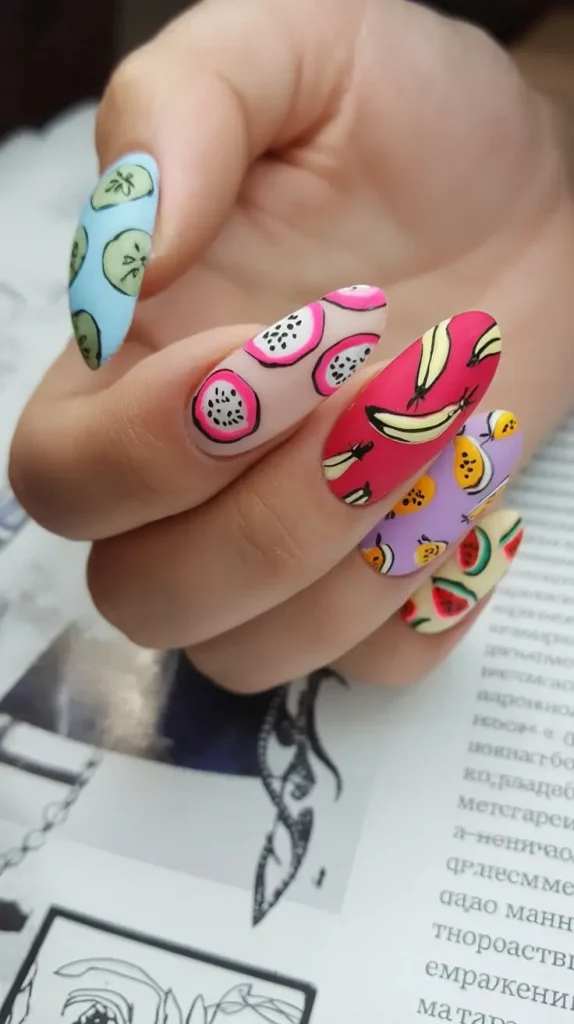
To recreate this at home, you’ll need pastel polishes (try the “Gelato” set by Lights Lacquer), matte topcoat, and nail art pens or fine brushes. You can use stamping kits or freehand each fruit with black outlines and vivid highlights for that pop-art look.
One tip: paint each fruit in layers. Start with your base color, sketch the fruit shape in lighter tones, outline in black, and finish with shadow details for dimension. Matte everything once you’re done for that creamy finish.
Honestly, this is one of those sets I’d do just for the photos. I imagine wearing these with a playful romper, sipping something out of a coconut. It’s a mood—and a perfect finale to any nail post.
Jungle Juice Couture
Now here’s a look for the maximalist at heart. Long, tapered nails are painted with vibrant base shades—lavender, turquoise, fuchsia—then layered with tropical illustrations like lime wedges, papayas, avocados, and palm leaves. It’s juicy chaos in the best possible way, and it totally nails (pun intended) the tropical vacation nails fruit Art vibe.
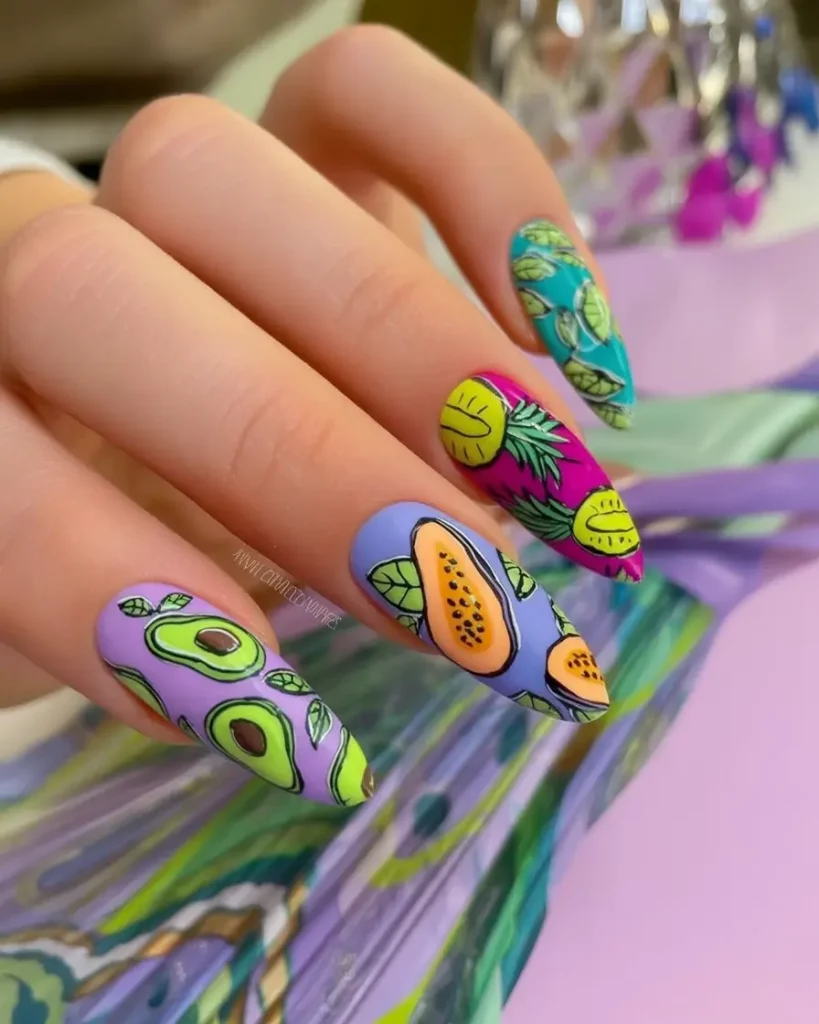
Start with neon and pastel base shades like Cirque Colors “Vice” collection. For the fruits, detail work is key: use high-pigment gel liners and a tiny brush. Black outlines help separate each fruit and make the colors pop. Top it all with a matte finish for a chalky, playful effect.
This design requires patience, but you can break it into steps: do the base first on all nails, then layer one fruit at a time. Don’t worry about making it too perfect—the charm is in the hand-drawn feel.
This design feels like a party on your hands. I’d wear this to a poolside birthday bash or a Miami escape. It’s giving Lisa Frank meets Versace vacation capsule.
Color Blocked Fruit Punch
This one is all about bold color blocks and fruity outlines. Square nails are painted in eye-popping solid colors—sunshine yellow, neon orange, grape purple, and teal—and each nail becomes a mini canvas for sketched fruits: bananas, melons, pitayas, and more. The combo of matte texture and comic-style linework is wildly effective.
For this, go bold with primary and secondary colors like Orly’s “La La Land” or Color Club’s “Pop Chalk.” Use a matte topcoat to tone down the shine and a micro-liner for the black outlines and details.
This set is fun to recreate using nail decals if hand-painting isn’t your strong suit. You can also stamp the fruit patterns, then trace over them with liner gel for that editorial punch.
If you’re the type to color-coordinate your manicure with your juice cleanse, this one’s for you. It’s cheeky, graphic, and totally Pinterest-board worthy.
3D Fruit Gel Extravaganza
Here’s where things get delightfully over-the-top. This manicure uses 3D gel to sculpt fruit shapes—grapefruit, lime, grapes, kiwi, dragon fruit—each bursting with a hyper-glossy, almost glass-like finish. The almond shape provides a chic foundation, and each finger is its own work of edible fruit Art.
Creating this look requires builder gels or hard gel for sculpting, bright gel polishes, and UV-curing layers. Use dotting tools and silicone brushes to shape the raised fruit slices and pulp textures. Finish with a topcoat like “Diamond Shine” for that wet, juicy finish.
This is definitely a salon-level set, but you can mimic parts of it with stickers or 3D embellishments if DIY is more your vibe. Focus on one or two nails, then keep the others simple.
This mani is a whole experience. I’d reserve this for a photoshoot, vacation, or even a fruit-themed birthday party. It’s over-the-top in the best possible way.
Speckled Banana Chic
Let’s wrap things up with something understated yet full of personality. These nails are painted a soft, ripe banana yellow and topped with tiny dark speckles—mimicking the skin of a perfectly sweet banana. No actual fruit shapes here, just a clever, wearable tribute to summer’s MVP snack.
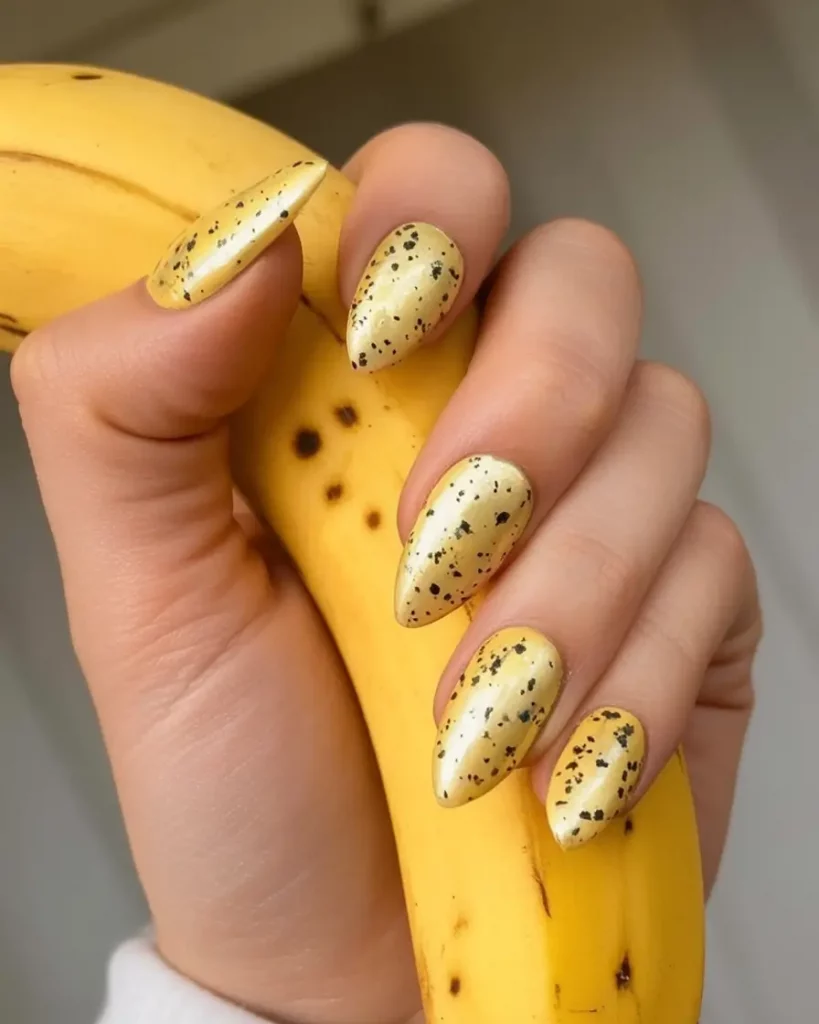
Use a creamy yellow gel like “Daisy Yellow” from The GelBottle and a black splatter polish or a toothbrush dipped in black gel for the speckle effect. Seal it with a glossy or satin topcoat depending on your preference.
This is one of the easiest looks to do at home—and one of the chicest. It reads minimalist from afar but surprises you up close with all the detail.
I’d wear this one to a weekend farmer’s market or a garden party. It’s easy, breezy, and still gives a quiet nod to the tropical fruit nails trend—without the need for decals or stickers.
Dragon Fruit Outline with a Neon Twist
Here’s a clean take on the dragon fruit theme that’s still edgy and vibrant. Each almond-shaped nail is painted a creamy white speckled with black “seeds,” bordered by a bright fuchsia outline that mimics the tropical fruit’s skin. This look keeps things tidy and graphic while still nodding to the boldness of summer.
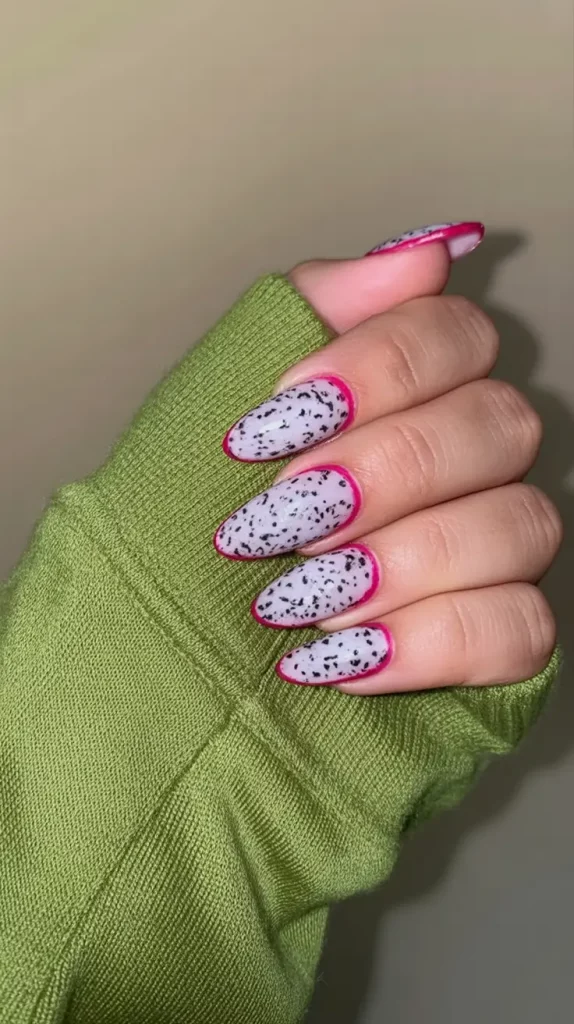
To get the dragon fruit effect, go with a white gel like OPI “Alpine Snow” or Madam Glam “Perfect White.” The tiny black flecks can be created using a dotting tool or sponge dipped in black polish. Use a thin brush to line the edge of each nail with bright pink gel polish like Kiara Sky’s “Flamingo.”
This is a fairly doable design even at home. After applying the white base and curing it, tap black speckles gently over the surface using a dotting sponge. The pink outline is the trickiest part—work slowly and clean up with a brush dipped in acetone if needed.
I love how this design feels trendy and clean at the same time. It would go perfectly with an oversized linen button-down and glossy lip balm. Minimal effort, major summer payoff.
Blood Orange Sparkle Slices
Talk about drama. These stiletto nails are layered with translucent orange bases and ultra-realistic blood orange slices painted across the tips. Sparkling glitter adds dimension, and the saturated citrus reds make this manicure feel fresh from a farmer’s market.
To recreate this fruit Art, start with a sheer orange builder gel or mix your own using orange polish and clear base. For the fruit design, you’ll need deep red and white liner gels to build the citrus wedges. A light dusting of iridescent glitter or shimmer topcoat like INM “Northern Lights” adds the sunlit effect.
This look is best left to the pros or attempted on press-on tips, but the key is layering color transparently. Use thin layers and cure between each step to avoid muddiness.
This is a summer festival nail if I’ve ever seen one. I’d wear these with a mesh top, glossy skin, and bold sunglasses. They say “I’m sweet—but don’t squeeze me.”
Kiwi Garden Mix
Here’s something softer, more botanical, and earthy. This mismatched kiwi-inspired mani combines leafy patterns, speckled dots, abstract fruit slices, and French tips—all in tones of moss, matcha, and pistachio. The long square shape gives it a clean slate, while the designs keep it playful and grounded.
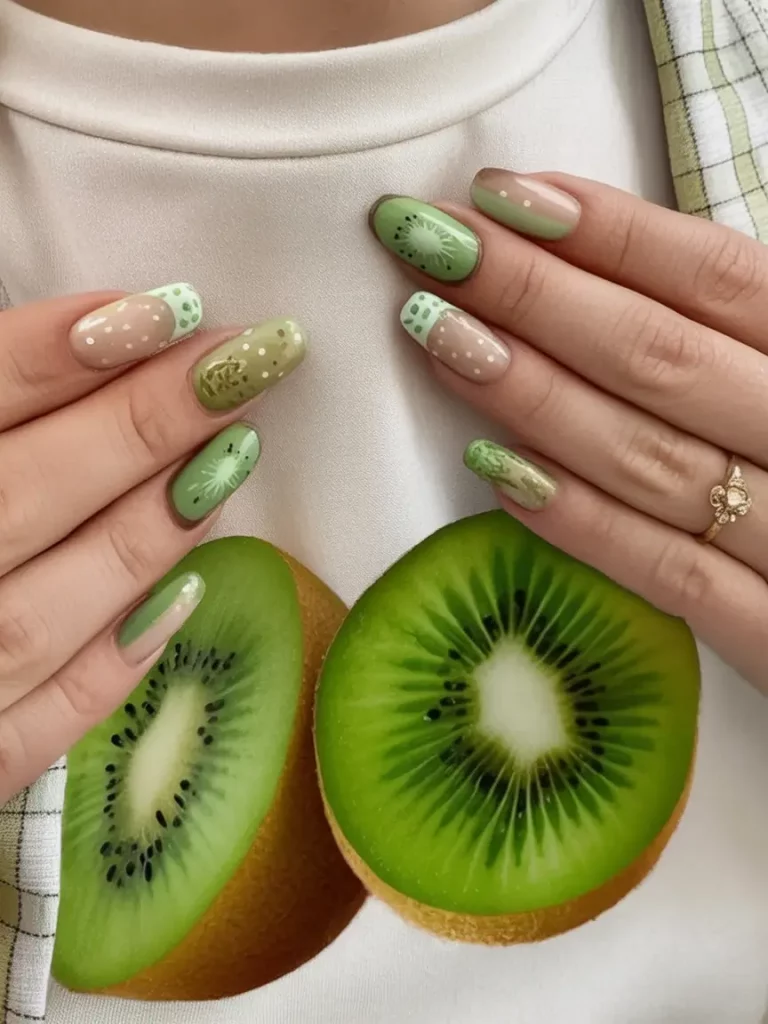
Try layering multiple greens like Zoya’s “Josie,” Essie’s “Sage You Love Me,” and Olive & June’s “Terracotta.” To recreate the kiwi halves, use white gel as your center, then layer in concentric circles of bright green and dot the center with black seeds. For extra detail, a leafy pattern can be added with stamping plates or fine brushes.
This is a creative take on tropical vacation nails fruit Designs—perfect for someone who loves detail without shouting for attention. The vibe is more picnic than pool party, and it still totally works.
I’d wear this for a garden brunch or trip to the botanical gardens—something low-key but stylish enough to be Insta-ready.
Lychee Bubbled Blush
These nails feel almost futuristic. The white-to-red ombré tip fades resemble lychee skin, while translucent 3D bubble details mimic the fruit’s texture. The squoval nail shape makes it surprisingly wearable despite the intense detailing.
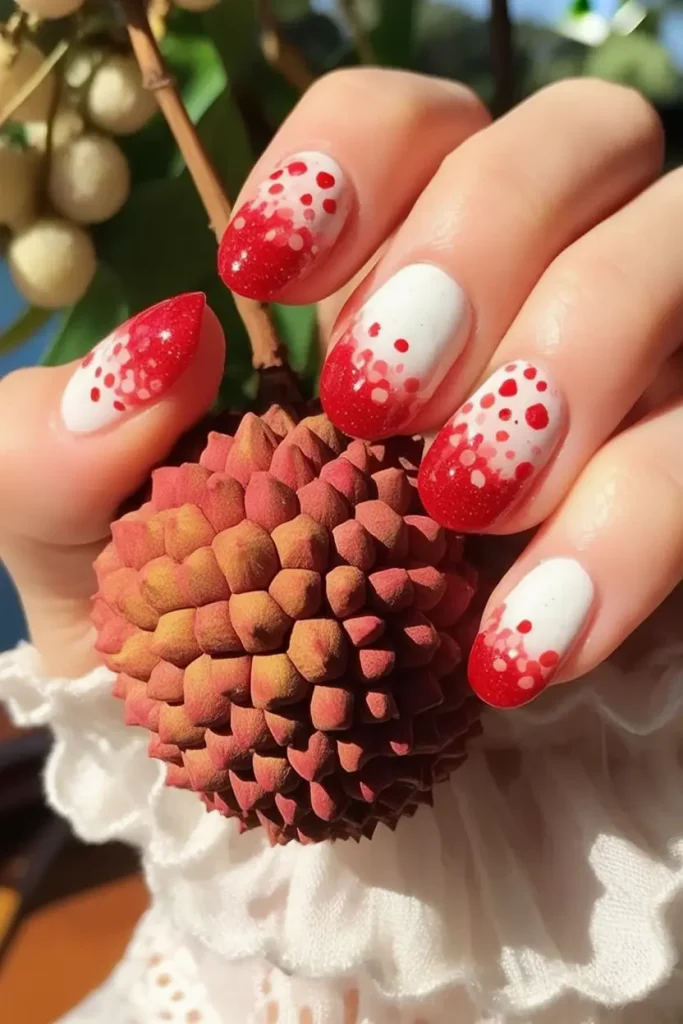
To recreate this design, start with a pale nude or milky white base. Blend into red at the tips using a sponge or airbrush if available. Apply clear gel bubbles with a dotting tool and cure immediately to preserve their shape.
The secret here is patience. Each bubble needs to be cured individually to hold its dimension. Pair with a milky topcoat or leave glossy for full impact.
This design is both minimalist and surreal. It’s one of those rare looks that feels editorial but still wearable for everyday glam. If you love playing with texture, this is your moment.
Citrus Carousel in Pastel
Let’s end on a juicy note. This pastel fruit slice design is like a dreamy sorbet served with a side of whimsy. Each nail is painted in a soft peach base and adorned with different citrus wedges—grapefruit, orange, lemon, lime, and even pink pomelo—sculpted in semi-3D gel for that “just-squeezed” look.
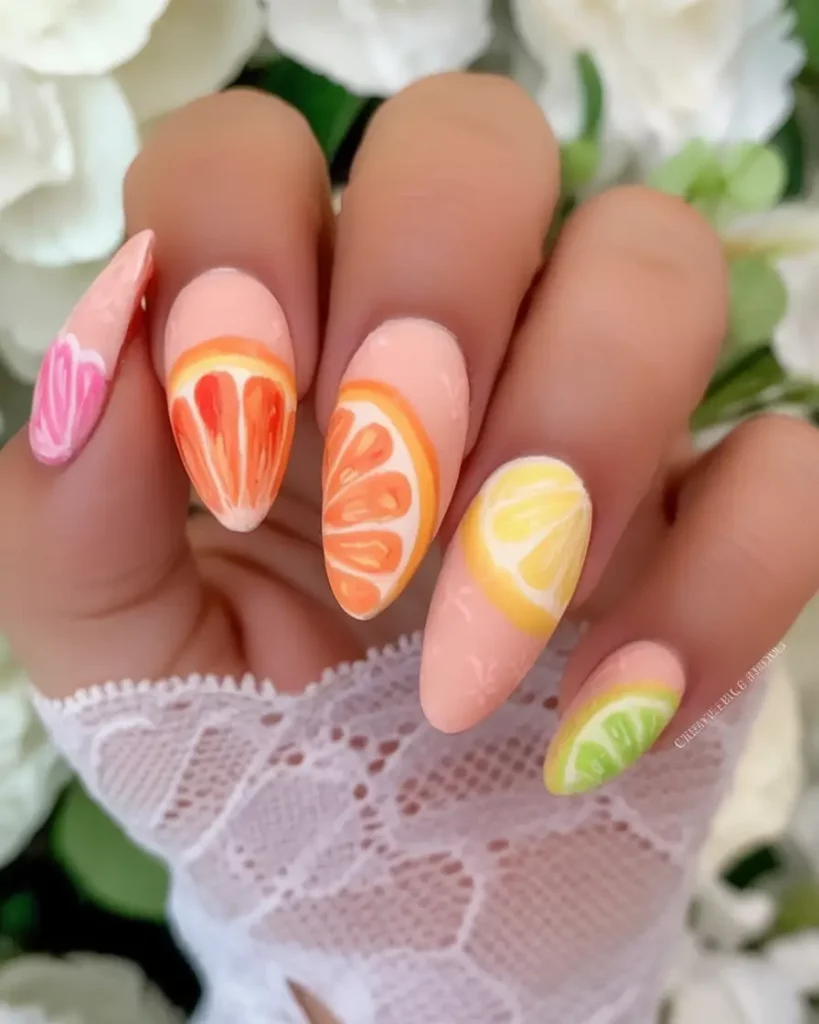
You’ll need builder gels in multiple citrus shades, a round flat brush for shading, and dotting tools for pulp texture. Start with a peachy nude base like “Tulle” by The GelBottle, then layer fruit slices on top with delicate color blends and gloss to finish.
Creating this at home might take some practice, but even one citrus wedge as an accent nail would be enough to give the vibe. It’s playful, unexpected, and photogenic in every light.
I’d wear this to a summer bridal shower or a chic picnic. It’s elegant and nostalgic—a nod to candy-colored summers from childhood, with a grown-up twist.
Coral & Watermelon Fantasy
This mani feels like sipping watermelon juice on a peachy summer sunset. The long almond nails are polished in a coral-meets-cantaloupe base, while the feature nails burst with stylized watermelon slices outlined in green and dotted with black seeds. There’s an almost watercolor softness to the fruit design that makes this set feel juicy, but not cartoonish.
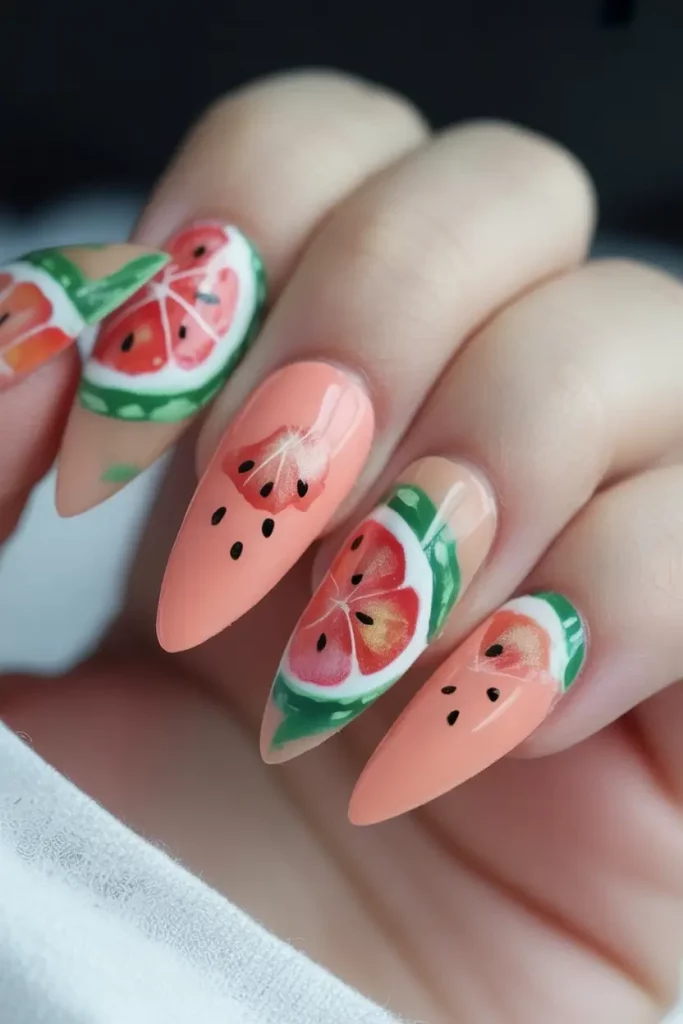
To recreate this, try “Tangerine Tease” by CND as your base and hand-paint the watermelon segments using red, white, green, and black liner gels. You’ll need a detail brush for the layered seeds and color blending. A semi-gloss topcoat helps preserve the softness of the look without dulling it.
This one is ideal if you want to ease into tropical vacation nails fruit Designs without going full neon. It’s feminine, fun, and still lets your nails be the main character of your beach outfit.
Candy Coated Fruit Mix
Okay—this is pure fun. Think candy store meets beach bar. Each nail features different neon fruit wedges—lime, kiwi, watermelon, grapefruit—designed in high-gloss, slightly domed gel art. The background is a mix of matte and gloss bubblegum pinks, and the layout gives each fruit its own VIP moment.
Use a high-pigment polish set for the fruits (The GelBottle’s “Neon Lights” collection is perfect), and sculpt the fruit with builder gel or bubble gel to give it a raised, 3D finish. The layering and line work on this mani mean it’s best done at a salon—but even simplified versions would be adorable.
It’s energetic, cheeky, and definitely trending for Summer 2025. This one belongs at a music festival, a beach bash, or even on your summer honeymoon.
Kiwi Pop on Lime Base
This one’s for the minimalist who still wants a little punch. A short square shape, fully coated in a matte lime green, gets a single accent nail with a kiwi slice encased in bright white. It’s bold, but in a “I just threw this on and it looked amazing” kind of way.
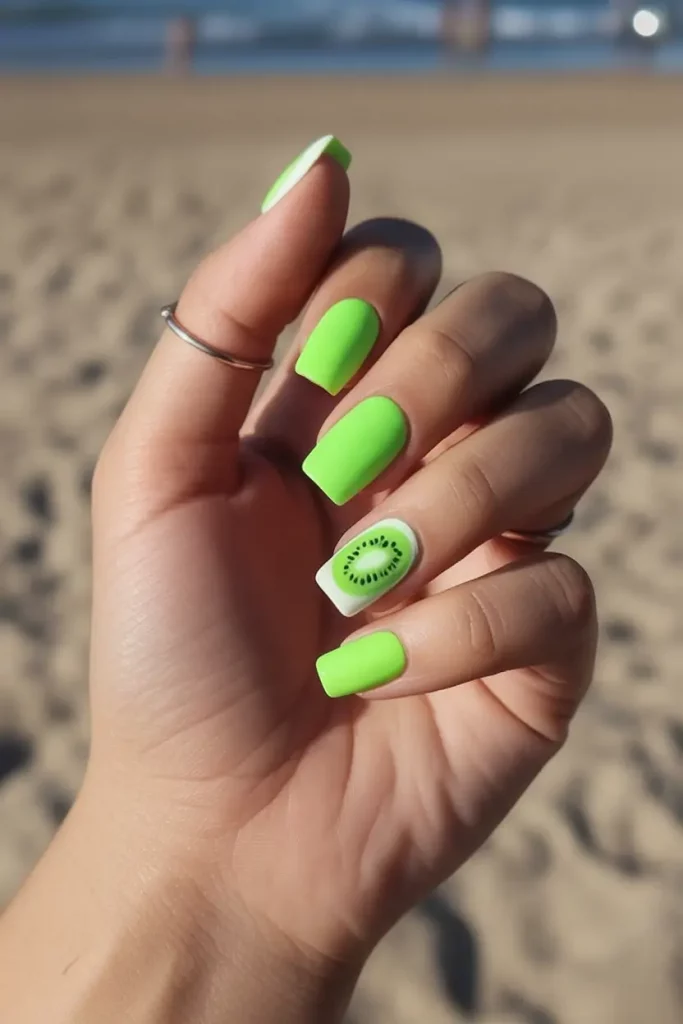
To pull this off, grab a neon green polish like “Wasabi” by Cirque Colors and pair it with “White on White” from China Glaze. The kiwi art is fairly simple—just a green oval, a white center ring, and tiny black dots. A matte topcoat brings it all together and keeps it fresh.
This mani is a great entry point into the tropical fruit nails trend if you’re not ready to go full glam. It’s wearable, it’s fresh, and it goes with every summer outfit—especially white swimsuits and linen sets.
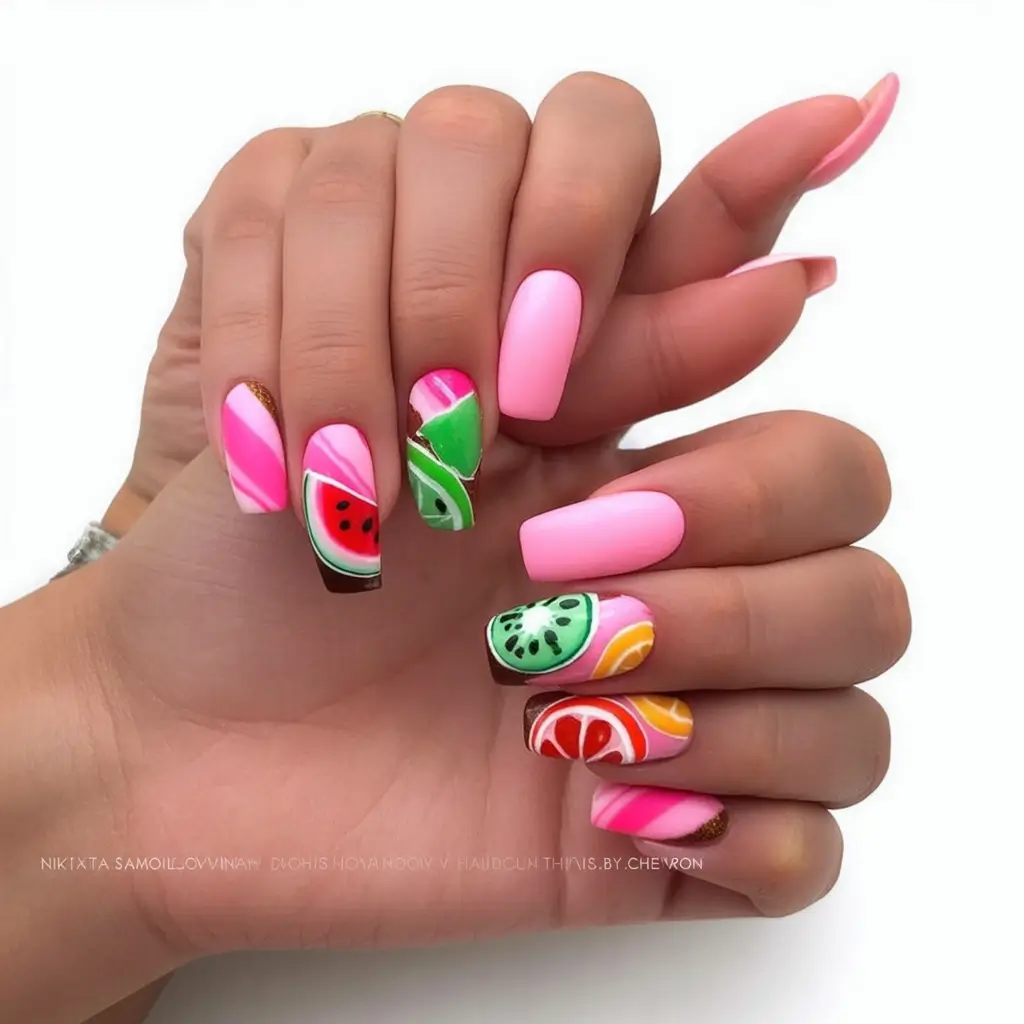
Juice Box Vibes
This set is peak juicy couture—in the literal sense. Five fruits take over the hand: watermelon, grapefruit, lemon, kiwi, and a dreamy pink citrus. Each fruit is painted in a hyper-realistic style and set against a clear or pastel base. The long stiletto shape gives it extra drama.
To DIY, this requires serious brush control. You’ll need multiple liner gels for each fruit—reds, yellows, greens, whites, plus sculpting gel for dimension. Each nail becomes a fruit slice, and a semi-gloss topcoat keeps them looking freshly peeled.
If you love Art, this is your jam. I’d wear this to an art show, a poolside brunch, or a girls’ weekend in the tropics. It’s not subtle, and that’s exactly why it works.
Conclusion
Whether you’re into glossy grapefruits, juicy kiwi slices, or minimalist banana speckles, tropical fruit nails are the perfect way to bring summer to your fingertips. These playful, vibrant designs capture vacation vibes in every brushstroke. So why not swap your neutrals for a little fruit-inspired fun? This season, your nails deserve to shine as bright as your mood.