Complete relaxation is the only way to describe this look: the petals appear to be softly floating on the nail, while the tiny crystals at its center resemble dewdrops. Soft indigo petals against a translucent milky-white base with a watercolor wash creates Sweet Milky Soft’s summer elegance.
Soft Ocean Petals with Crystal Dewdrops
Soft Ocean Petals with Crystal Dewdrops undoubtedly ranks among the most delicate designs I have come across. This manicure captivates with its effortless charm and gentle elegance. For this design, I went with an OPI sheer white “Funny Bunny” as the base and blended in some “Show Us Your Tips!” florals. The Swarovski crystals (SS3) work perfectly as tiny dewdrops when applied with nail glue, and for the petal detail, a dotting tool and a fine liner brush are necessities. Make sure to add the glossy top coat; the glassy shine it provides amplifies the stunning clear finish of the design.
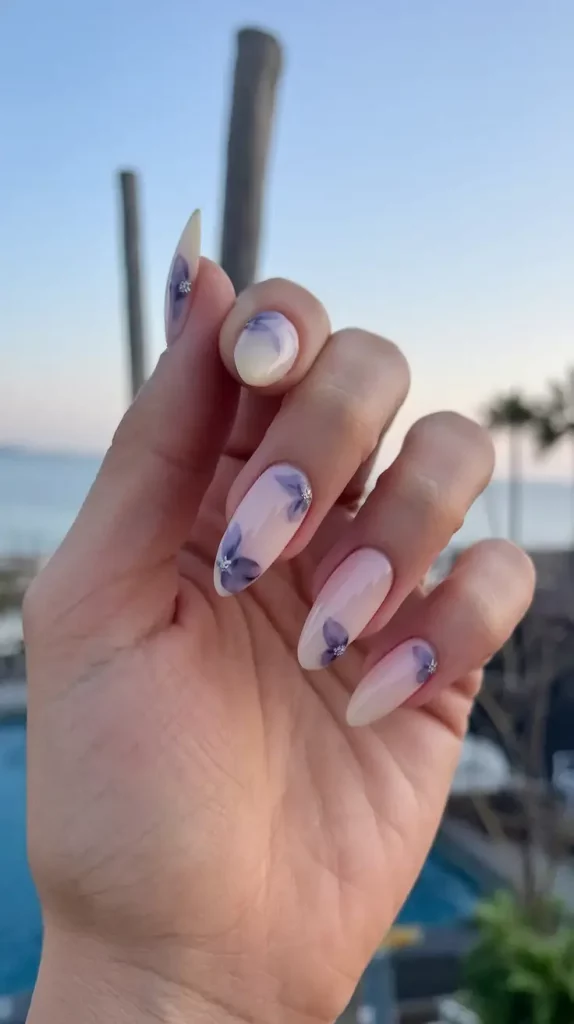
In order to achieve the elegant taper you see in the photo, start off by filing your nails into an almond or soft stiletto shape. Proceed to apply a thin tape on your nail for the dewy look. Pour some of the blue polish into a separate container in order to work with. Shake the container until the polish turns into small droplets. Lastly, place the cute little blue beads onto the frame using a tweezer, and when your top coat is still wet, blots the flower to prevent it from detaching. Cure everything under the UV lamp if using gel polish. Celebrity manicurist Tom Bachik gave me this tip, seal your crystals with top coat around the edges throughout to seal without masking the sparkle.
Though I was simply running errands in sandals, this one captured my imagination so much that I literally felt as though I was on a yacht in Capri. I do believe that this will become a trend under the summer nail art ideas blue and nail art ideas for summer beach design tags this season. The beauty is so effortless and more elegant than expected.
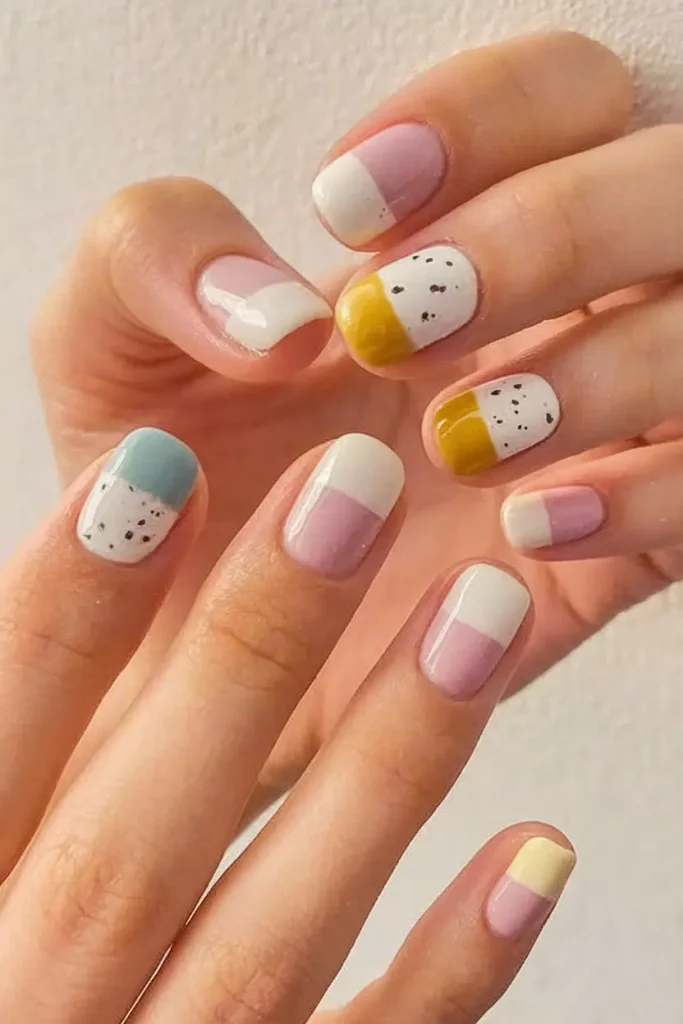
Neon Pop Meets Clean Chic
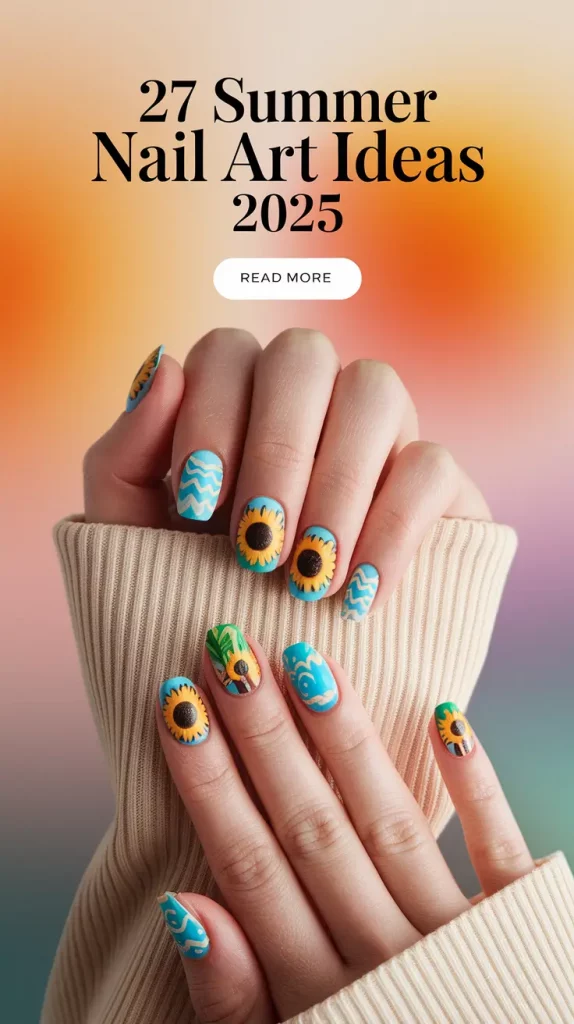
The way a high-shine neutral balances with those juicy neons is pure magic. So franklly, I wasn’t expecting to love a combo this bold. The playful, youthful vibe comes without sacrificing sophistication. The white base nails keep things grounded and the rainbow lines are pure summer carnival energy. Last August I wore something similar, and to my surprise, I got compliments from both a barista and a random stranger on the subway (which never happens).
For clean nails, you’ll want a semi-sheer white base like Essie’s “Marshmallow,” and don’t forget to scoop a set of ultra-pigmented striping polish or gel liner in ultra feminine pink, orange, yellow and green neons (I love the ones from Beetles Gel Polish or Modelones). A striping brush is a must—if you’re not trying to bang out something orderly and uniform, stick to a regular brush and just go wild chaos mode (trust me).
Once you’ve primed your nails, apply two layers of your white base, ensuring it dries completely. For the accent nails, fill in your stripe design with alternating neon colors. It is easier if you place a single center stripe first and then build outwards. A matte top coat is stunning here to juxtapose the glossy white—such an amazing detail for Instagram. As noted by Dua Lipa’s nail artist, Elle Gerstein, high contrast finishes are the most effective means of achieving that salon-look to a manicure regardless of the high-low styling intricacies.
If you’re looking for the easiest summer nail art ideas, with some research, you will land on this idea in nail art for short nails. This option is flattering on squoval or square shapes, feels fun but not overly childish middle, and makes your hands look so good against a tan.
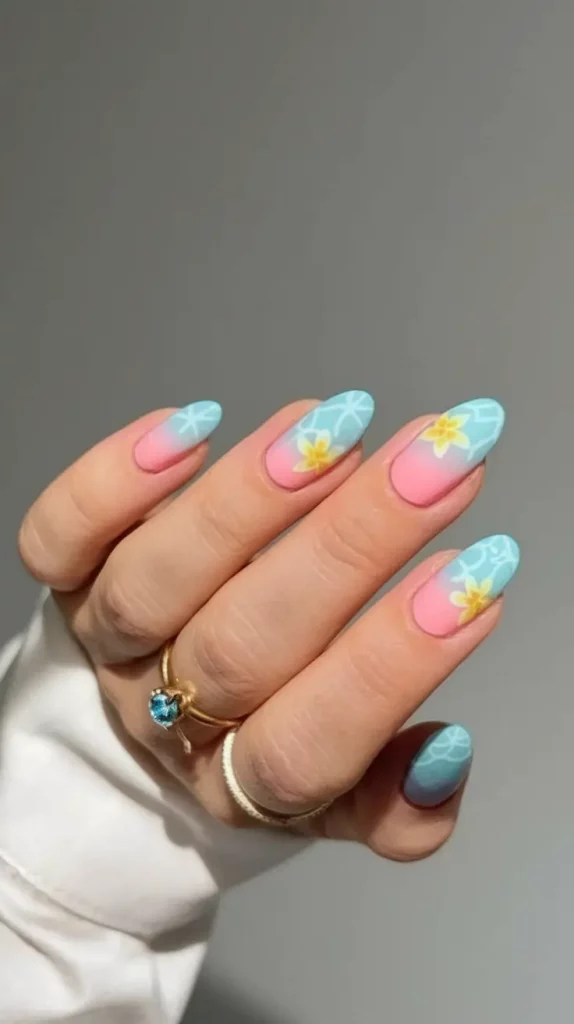
Citrus Twist With Coastal Cool
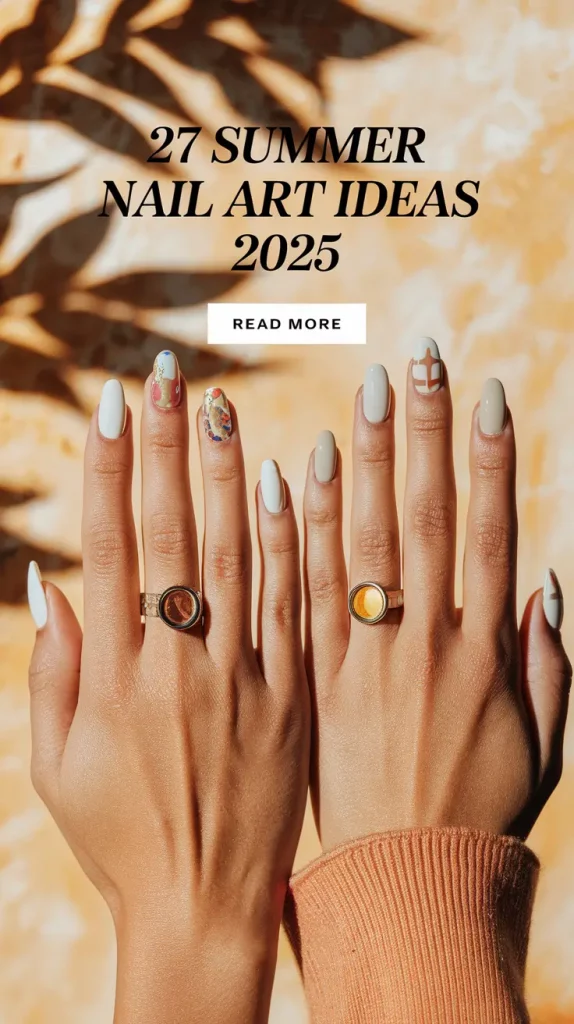
The shimmer in the design of a beach umbrella should gleam like the sun, whilst the colors should be matte finishes in sorbet shades. This is how I would imagine a beach umbrella would look like after attending art school. Here the design is simply soft corn flower blue combined with lemon sorbet and a hint of sand making the look dreamy. There are some nails which combine delicate shimmer with speckled stone patterns that truly capture an aged seashell. All of this is placed in ten little canvases which packed one full summer story.
![]()
In order to achieve this summers story, three polishes will do the trick. One polish must be a mellow yellow like Zoya’s “Bee”, Essie’s “You Do Blue”, and a shimmer sheer with a hint of pink like OPI’s “Bubble Bath” will also work. Try mixing your colors freely while using tape or nail vinyls to create crisp lines. Try to dab grey polish using a sponge for the stone effect nails with layering glitter on a glitter coat.
What works best? A matte top coat. The transformation is extraordinary. After every step, let each layer dry, apply your designs over a base coat, and seal it with a matte top coat. If you enclose the tips with your top coat, this look stays on longer than expected. With a beachy vibe, this manicure lasts longer than two days. Count me in.
This immediately made my Pinterest board titled nail art inspirations for summer beach design and easy summer nail art. I wore it on a long weekend getaway to the coast which was like having sunshine at my fingertips.
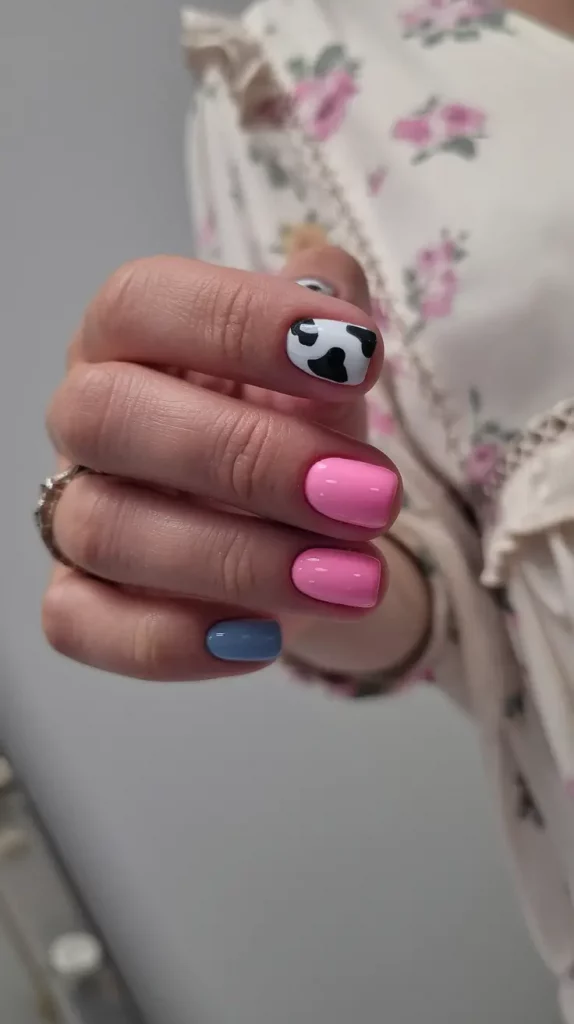
Pastel Blue with a Lucky Charm
sometimes, cute is all you need. Not edgy or editorial – Simply sweet. And this baby blue mani with a ladybug accent anima provides all the feel good vibes. It’s fun in the mes gratifying way and super simple to achieve. The short, square shape keeps it modern, and that tiny ladybug serves as a personal good luck charm all summer.
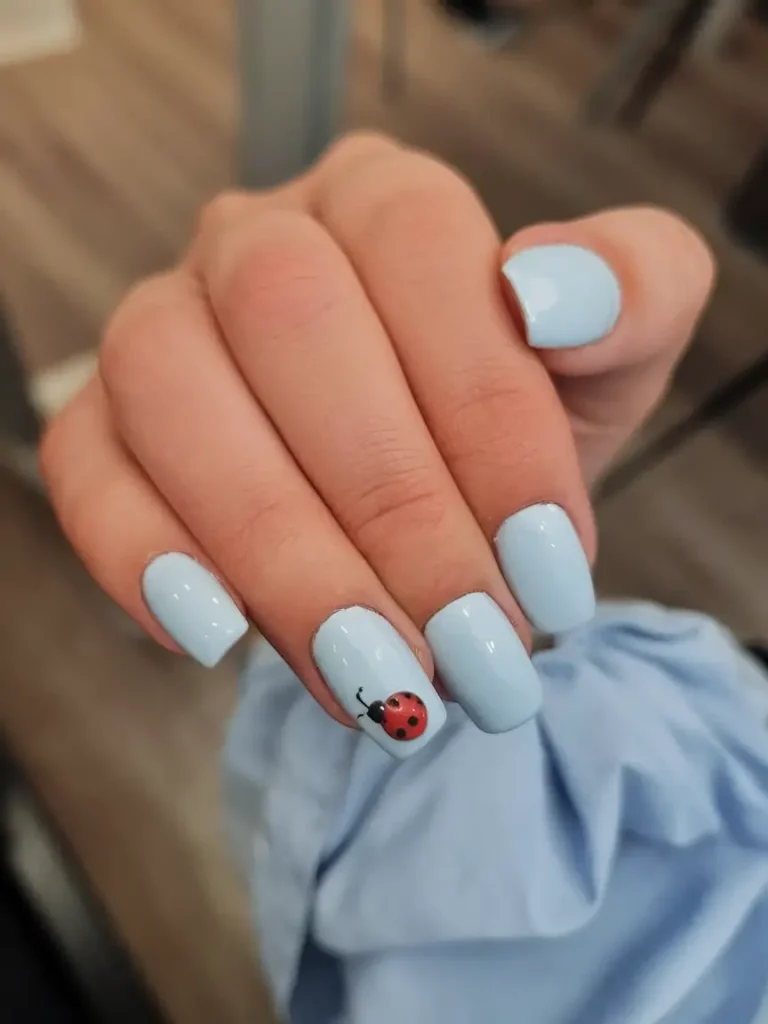
Essie’s “Borrowed & Blue” will give you the creamy pastel polish you need, and a nail art pen or sticker can be used for the ladybug. If hand painting the ladybug interests you, grab a fine dotting tool and red, black, and a bit of white paint. To play up the look, add a matte topcoat. To keep things shiny and bright, gloss it up—your choice.
Realistically, this design can be done in under an hour. Grab a base coat, apply a top coat, and you’re done. It’s perfect for anyone on a time crunch. No need for any fancy brushes either—a couple of dotting tools and a toothpick will do.
This design is super easy if you’re looking for sumer nail art ideas for short nails. I wore it on a rainy day just to fake a little sunshine. It worked!
Electric French Pop
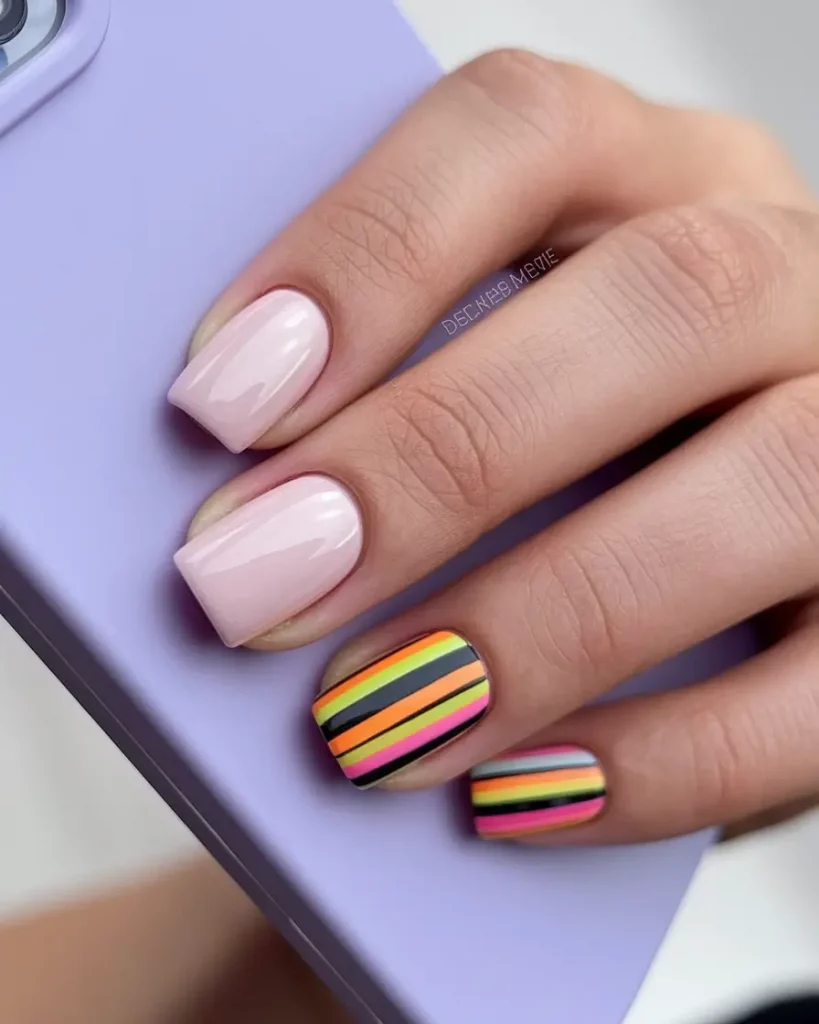
Say hello to the wild side of French manicures—this is their rebellious younger sister. The base is neutral creamy, but vivid pink and neon green stripes cut through with bold contrast. Geometric, edgy, and totally day-to-day summer vibes ready. And those glossy accent nails in solid lime and hot magenta? Literal pops of color, like your nails just sipped a poolside cocktail.
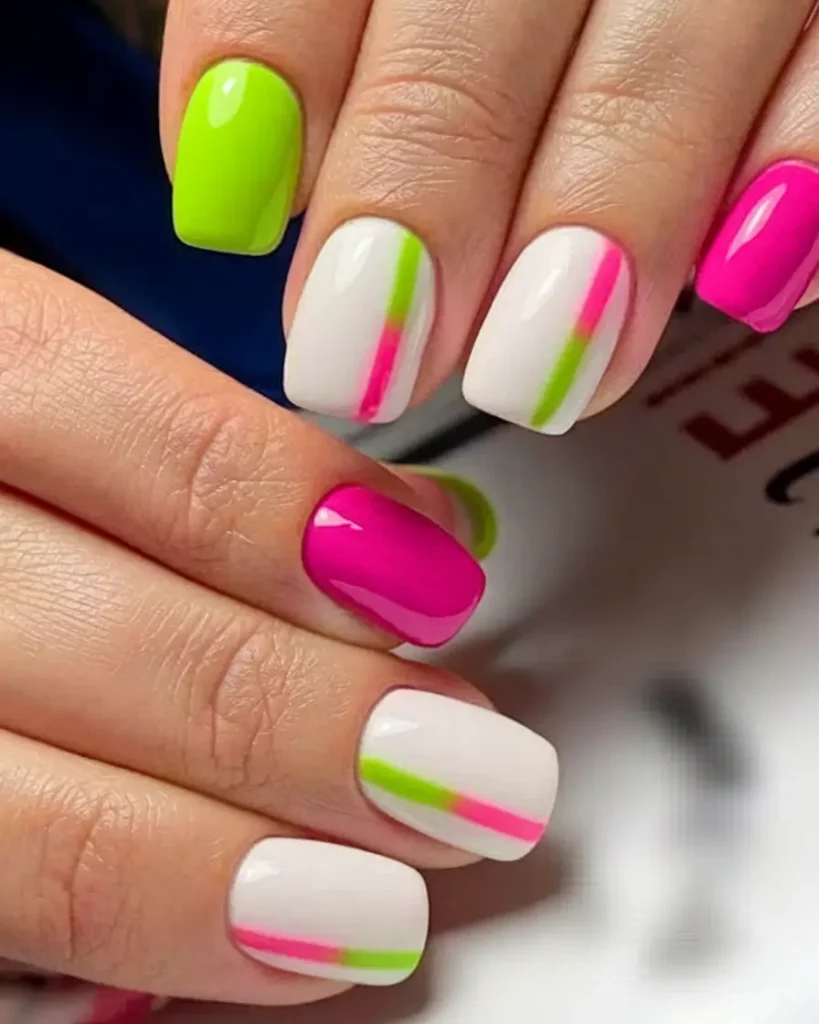
For the base, I went with OPI’s “Put It In Neutral.” Then for the bright stripes, I used gel liners from Rosalind with shade 305 (neon pink) and 407 (lime). If you want perfect edges, cruising with striping tape is a must. However, I love the irregular hand done look as well. Pro tip: use a no wipe topcoat if you are working with gel polish. It helps maintain sharp contrast, which is great.
This style is best suited for alternating solid and striped designs—just like color blocking your outfit. Apply two layers of your nude base and cure. Then you can use a striping brush and paint opposite corners with clean visual movement lines. You can seal everything with a high gloss top coat which would make the shine greater, or go matte which gives a more old editorial look. Celebrity nail artist Betina Goldstein says bold color blocking is having a major moment this season, and we’re here for it.
If you are searching for summer nail art ideas or segregated bold and minimal nail designs sleek and chic at the same time, this summer nail art is perfect. I’ve worn this one to brunch and boardwalk strolls—it works every time.
Straight-forward eye grabbing summers heart nails also has a side setting heart nails which makes a sweet summery gem.
Juicy Green With a Heartbeat
This design is not suited for the shy—and that’s what I love about it. Fabulously, a full-on glossy green base combined with playful pink love hearts gives off a tropical vibe. It’s sassy, action spirited and sugarspun which is what almost any lady desires from radical designs. It is good fun and truly prominent, ready to flaunt at any time. This is the kind of nails that rides along dream-like vibes when you’re ready to be noticed.
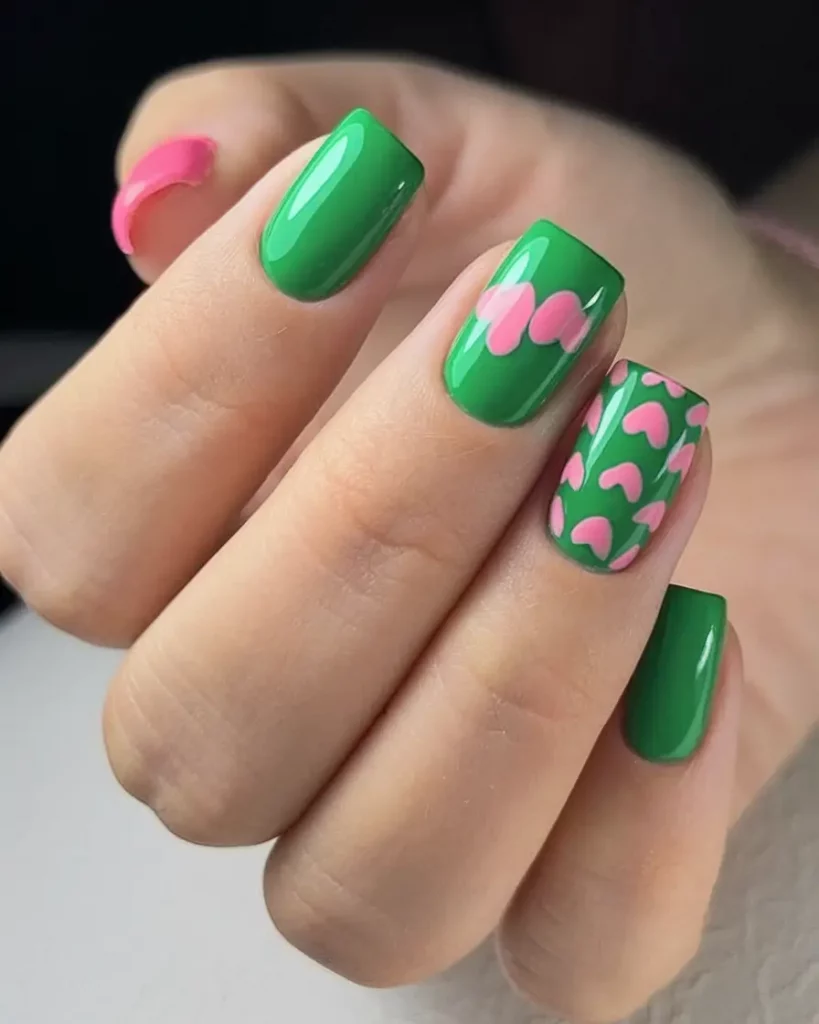
My favorite base is: “I’m Soo Swamped!” from OPI. For the hearts, I either use pink acrylic paint and a fine nail art brush or grab some stick on decals if I am in a hurry. Finish off with a gel top coat to give it that lovely candy shell shimmer. That’s right, candy shimmer. It seals everything in and gives extra dimension to the hearts.
After a base coat and two layers of green polish, the next step is to create the heart shapes with a dotting tool. For the hearts, all you need is two dots side by side and a brush to pull them down to a point. Want that cute 3D effect? Add another layer with pink once the first is dry. If you’re using decals, put them on the nail while the polish is still tacky. Nail artist Queenie Nguyen says these playful retro patterns are everywhere right now and I couldn’t love it more. Especially when combined with juicy summer shades.
If you are on a search for summer nail art ideas, these are flirty and bold which are perfect for festival weekends or hanging out in the park with friends. I wore it with a lime green sundress and felt like a walking watermelon (in the best way possible).
Retro Daisies on Cherry Red
What about this daisy design has me smiling from ear to ear? The red-hot polish base is so vibrant, the tiny white daisies on top pop vividly and invoke thoughts of picnic season. I can’t pinpoint it, but there is something vintage-y about the vibe; maybe a retro dress from the 70s or a strawberry soda in a glass bottle. It is flirty and playful, without being over-the-top, and looks good on any skin tone.
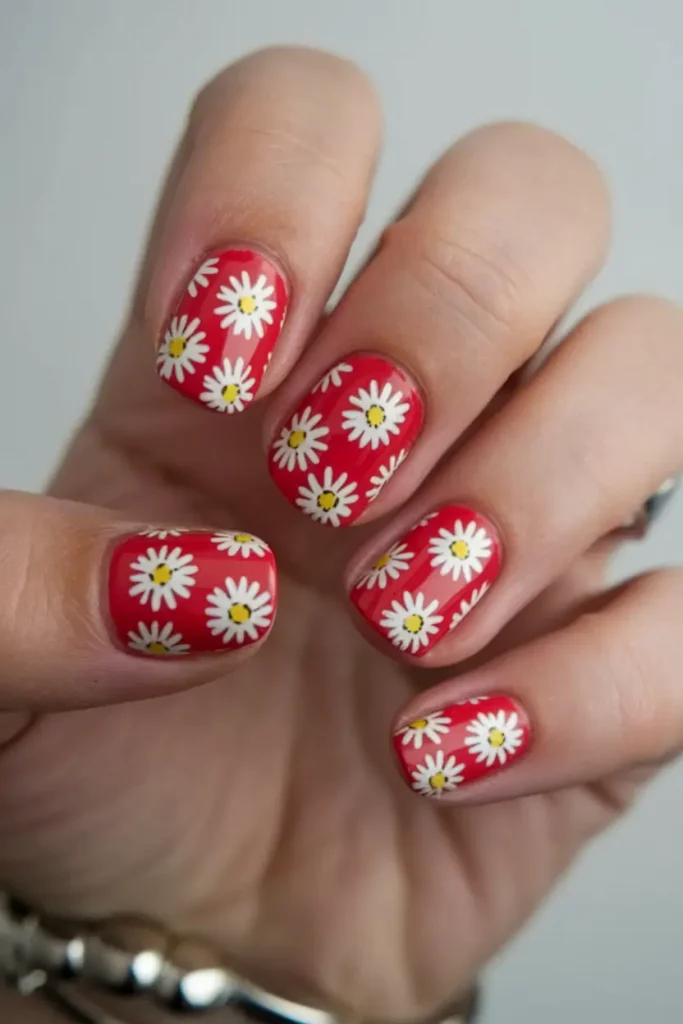
To achieve the look, I begin with Essie’s “Russian Roulette” as the base, which is that perfect cherry red. The daisies are then hand-dotted with a white nail art pen (I use Sally Hansen’s I Heart Nail Art Tool) and yellow for the centers. If you’d rather use stickers, go ahead, but I prefer hand dotting because I have more control. The challenge is to evenly space the petals around the center and not crowd the nail.
Two coats of red polish should be applied and left to dry fully. For each flower, use five small dots in a circular formation for the white petals, then a yellow one in the middle. This design truly comes to life with a glossy top coat. I have spotted this kind of design all over Pinterest lately under summer nail art ideas simple and nail art ideas for summer, and honestly, I don’t think it’s going anywhere anytime soon.
This specific one makes me smile every time I catch it in some sunlight, and comes into my rotation whenever I am looking for something merry that does not take itself too seriously. And to be honest, we could all use more of that energy this summer.
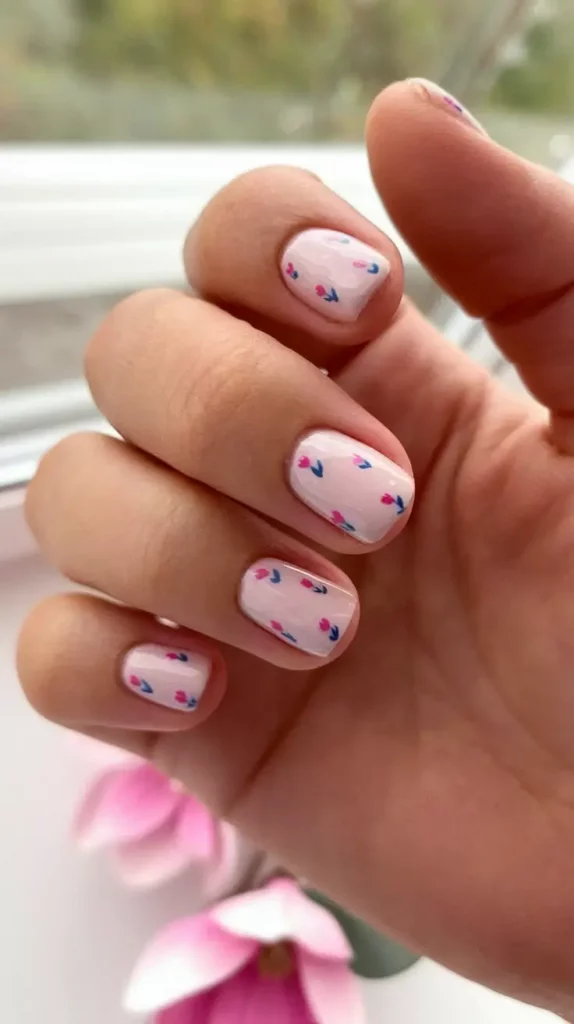
Soft Pink Fields with Daisy Tips
I’m glad that we have different styles for rest of the season, and different ozhtots for floral print. When we think about floral designs, this is particularly more relaxed and easier than the traditional ones. Blooms on flowers and herbs: these particularly look better in the summer.
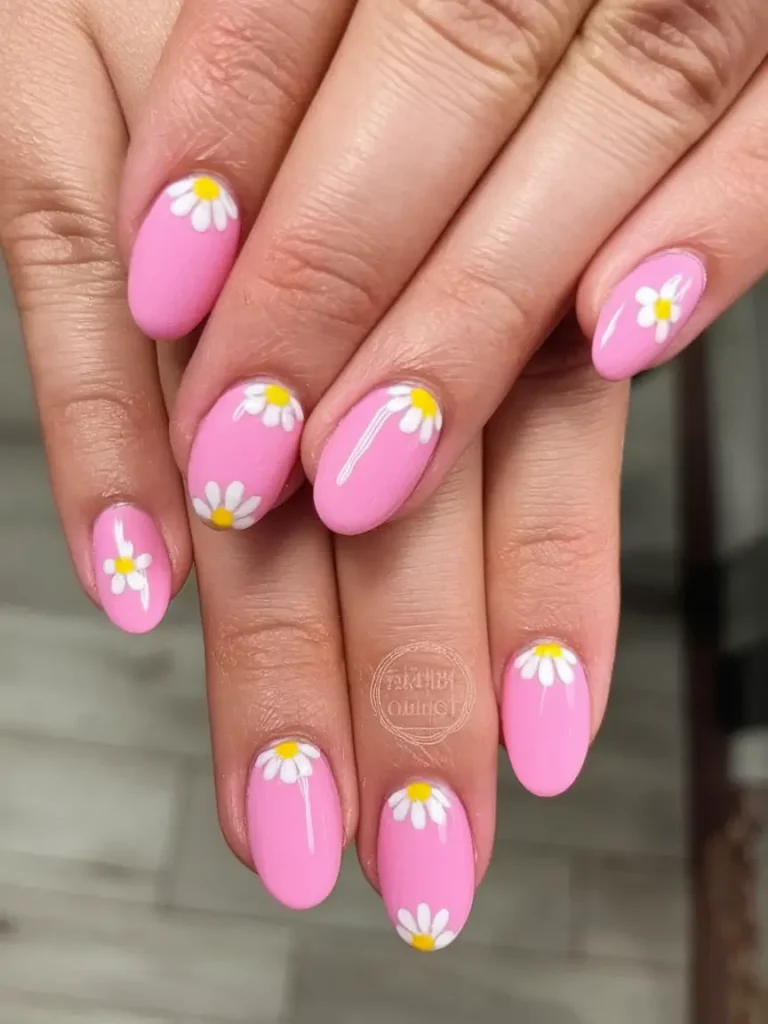
To start, we’re going to need a pink base such as Ballet Slippers by Essie or Baby Pink by The Gel Bottle. Next, grab a dotting tool and create white flowers with yellow centers, this time lower on the nail instead of at the tip. It completely changes the vibe. Don’t forget to add a gloss top coat.
Often we say some designs take time and attention, while the task of getting on something is far easier than what it seems. All you have to do is select colors trim and assemble as you wish, I recommend following the top step to save time and clashing. While you don’t require waiting in line to dry: cure or dry the base, crown of dots daisy away completing step in my bubbles lesson your dandy base.
Mr Decorate Stripe highlights: be mindful to polish the dotting tool otherwise you may smudge. As adornment sneak sneak outline, I find this to pass stroll while looking put together snappy polished if executed right in a delicate way.I rocked this mani on days when I wanted to feel put-together, although not too ‘loud’ at the same time. It works with everything including casually elegant linen and coverups by the pool. If you’re looking for short summer nail art designs suitable for longer almond shapes, this one will not disappoint.
Strawberry Fields Forever
What could be more summer-y than strawberries? This design captures it perfectly—actually no pun intended. It features a chic retro farm stand look with bright red glossy tips, one white nail adorned with a cute straw drawing and a cheeky polka dot accent; farm stand meets kawaii chic. The dynamic playfulness balanced with sharpness is just wonderful.
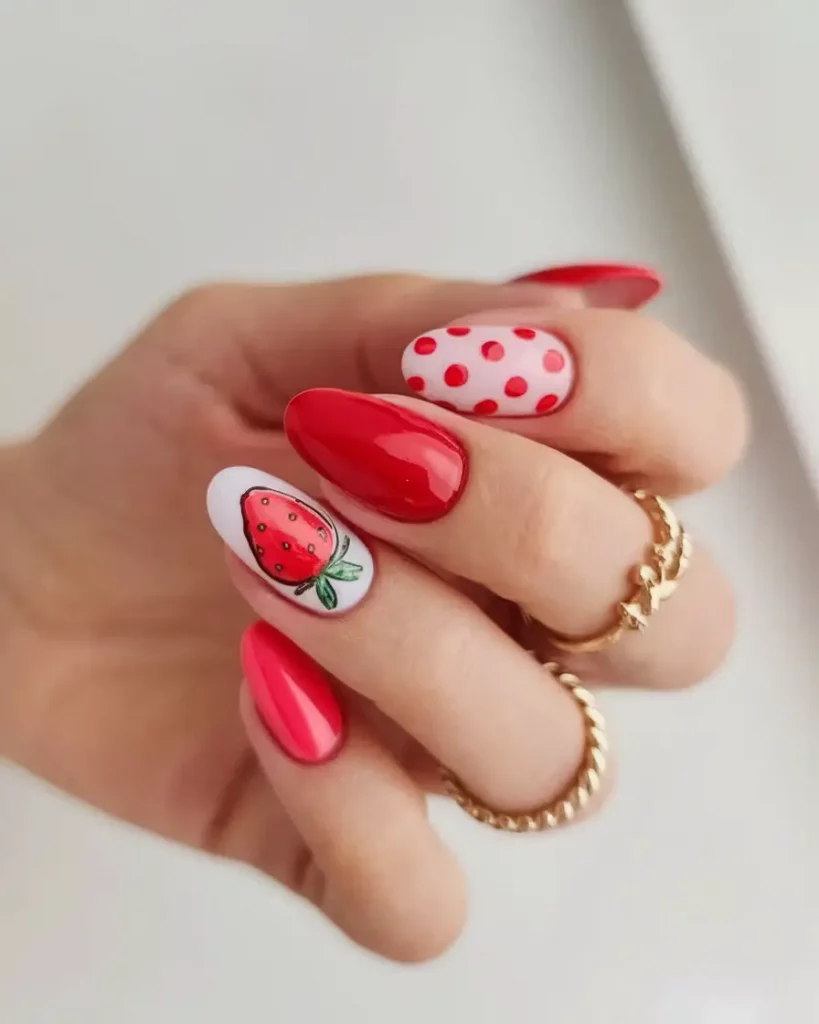
To create this, start with a mix of red like “Big Apple Red” by OPI and “Blanco” by Essie for the base colors, and Paint the strawberry either with a tiny brush and a steady hand, or nail stickers if freehand isn’t your jam. And the polka dot nail so much fun. It really brings the look together.Use red to polish your nails first, and let them dry or harden. For the strawberry, outline a rough heart shape in red, outline it with green leaves, and then add tiny white dots for seeds. A toothpick or dotting tool will do the trick.
The combo of white and red is beautiful with a super glossy finish for sun catching. Harper’s Bazaar estimates that fruit-themed manicures—this nail art for summer—will be one of the most popular trends in 2025.
This set? Absolute bliss. It made me reminisce about strawberry lemonade, paired with vintage rom-coms. I guess the kids aren’t wrong these days I will never get over the fact that it’s not just a mani, it’s a whole mood.

Sunkissed Orange Glow
Citrus fruits are at the top of my list of one-of-a-kind summer fruit. This design brings the juiciness of ripe oranges to life: glossy full orange nails complemented with bright segments layered on a sheer nude base. The inflection of fun polish and detailed art is my favorite part, and this design does not disappoint. It makes me want an Aperol spritz.
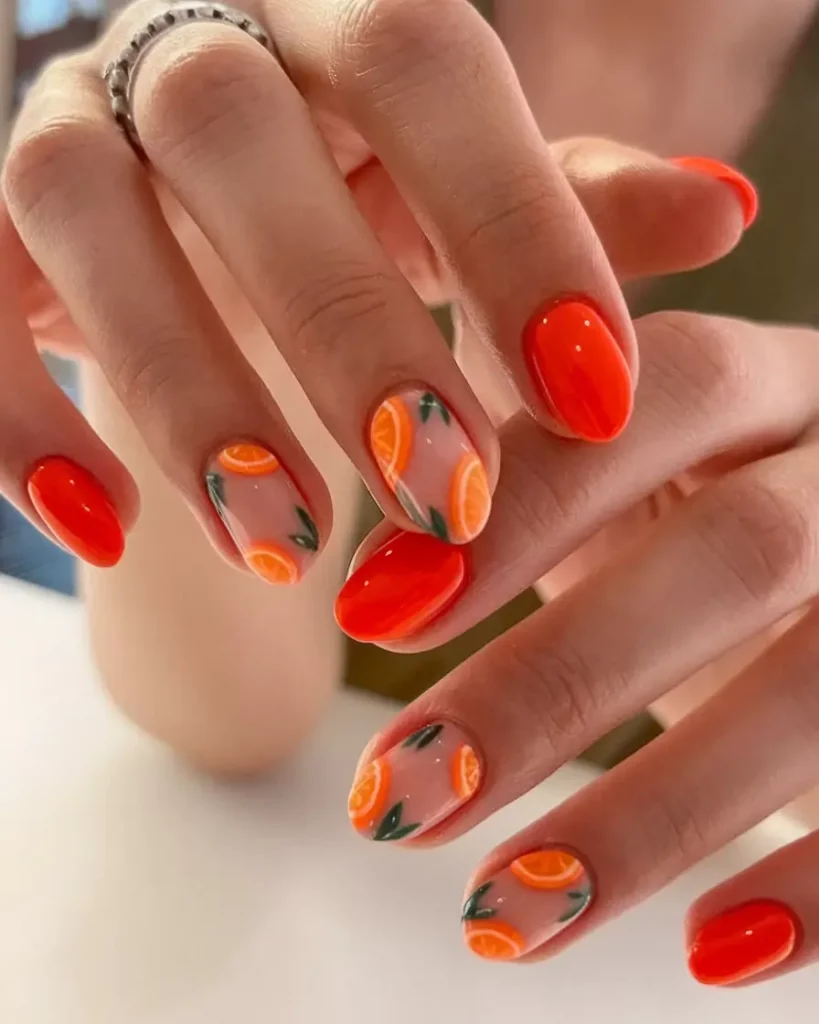
For the ultimate look, start with a sheer nude “Bare My Soul” by OPI, and finish with “Atomic Orange” or “My Chihuahua Doesn’t Bite Anymore.” Use a fine liner brush for the orange slices and a small detail brush for the green leaves. To enhance the light effect, I add a tiny white crescent shape on each orange slice. The trick is to make the slices free and chaotic, so don’t try too hard to achieve balance—harmony is key.
Start by painting the base color, allowing it to harden, after which you can sketch orange half-moons. Fill the half-moons with two different shades of orange to create depth, then outline with white, dotting a leaf or two next to each. Finally, add a super-glossy top coat to accentuate the fruit. Nail artist @nailsbymei swears translucent colors give layered effects, making the fruit art look juicy.
These would all fall under summer beach nail art ideas—they’re fresh, fun, and cheeky. I wore this to a party on a hot summer day and my nails got more compliments than my dress (which is a true story).
Fruity Minimalism on Nude
This one’s for “clean girl aesthetic” lovers who want a playful touch—tiny fruit motifs like cherries, lemons, and watermelons are scattered stategically over glossy nude nails. The set is effortless yet cute. It’s flirty, and I would describe this as summer in a farmer’s market on your fingertips.
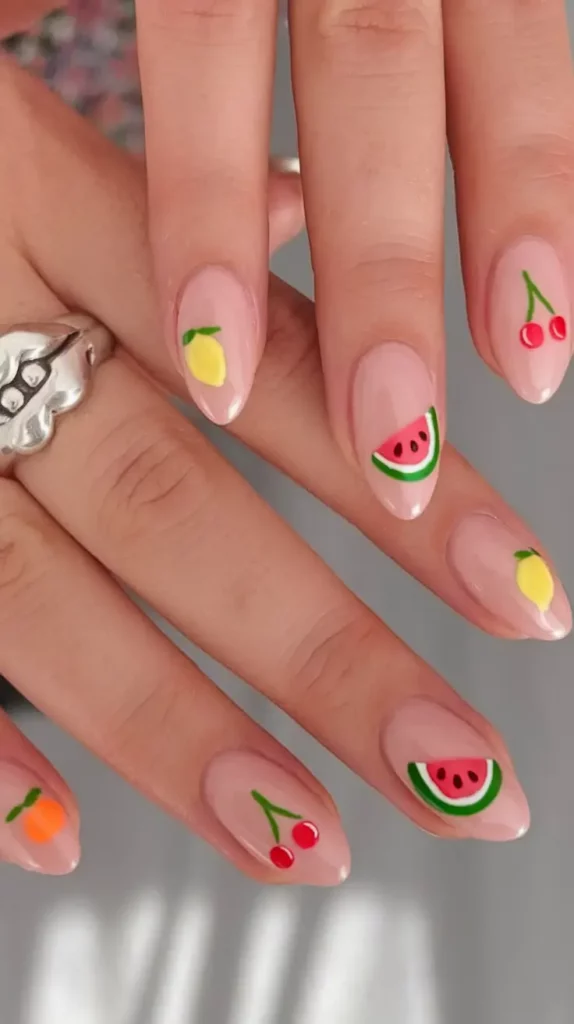
For this design, I applied a sheer pink-beige polish such as Essie’s “Mademoiselle” which is soft and not too overpowering. To make the fruits, I used dotting tools and mini brushes along with gel colors from The Gel Bottle’s Fruity Brights Set. If you lack precision, trying out water decals is a great alternative. One step that cannot be skipped though is applying a glossy top coat; without it, the fresh-finished look is not achieved.
First, put on two layers of your nude base and make sure to cure each one. After painting the base layer, it’s time to bring the fruits to life: for cherries and watermelons, make circular dots, for lemons use half circles and for the leaves, paint short green lines. Each of these motifs is finished off with a tiny white detail to depict a light reflection. Nail artist Hang Nguyen (aka @thehangedit) suggests that negative space is great for minimalistic designs, “letting blue space breathe” prevents the design from feeling overcrowded.
These are some easy summeless nail art ideas that you can absolutely do yourself, especially if you’re looking to experiment with simple designs for short nails. And a clean, cute, and slightly quirky style? I’m here for it.
Dewdrops & Butter Blooms
I can’t get enough of this soft pastel ensemble. It includes light mint & lemon hues, semi-opaque finishes, and 3D dewdrops that resemble pearls of water. Toss in a few single yellow blooms and it transforms into a poetic little garden scene where the vibe is cool, delicate, and deeply relaxing.
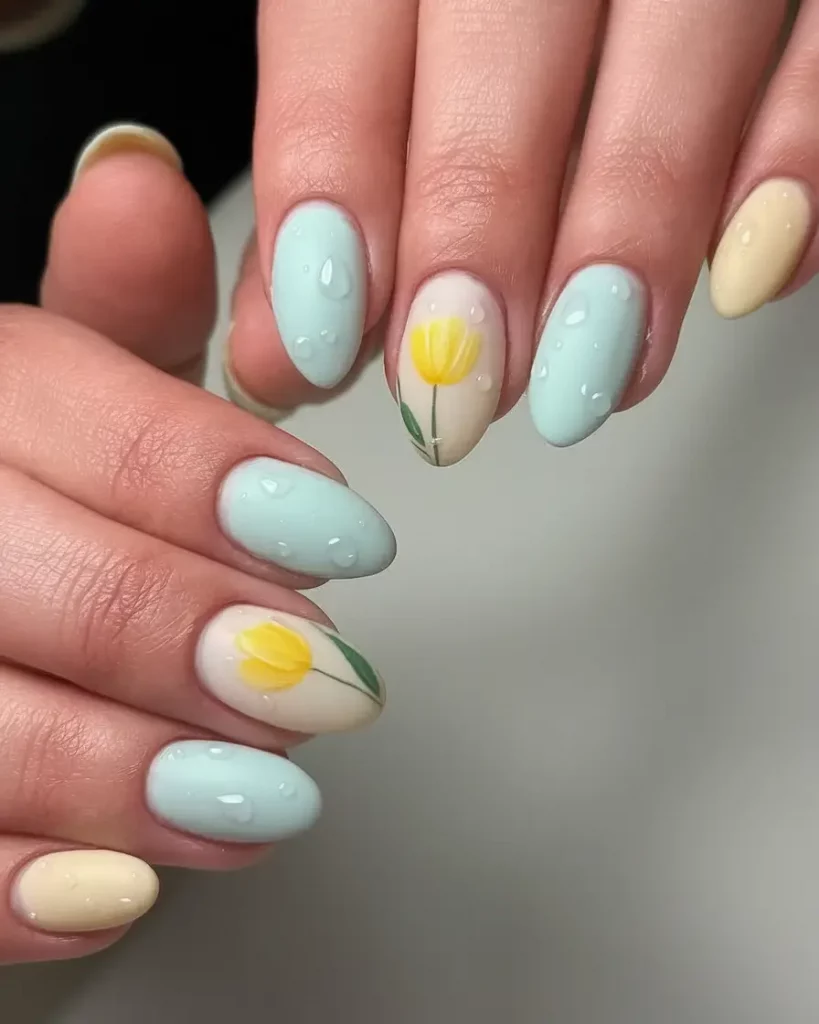
Essie’s “Mint Candy Apple” and Holo Taco’s “Lemonade” are ideal for this look. For the raindrops, I apply clear builder gel dots placed on top after everything has dried. It creates that raise, glassy bubble effect, which is surprisingly stable with a good top coat.
Paint alternating pastel colors on the top and let them cure. For the tulip flowers, a fine detail brush is essential. Layer several petals using a yellow gradient and finish with a green stem. Where each raindrop will be placed, use a dotting tool to apply clear gel and flash-cure each one before moving on. Dew drops need top coat applied around them, not over, to retain the 3D look. As reported by Refinery29, nature-themed details are a key highlight for summer nail art ideas & design this year—less “nail art”, more “tiny story” is the shift in thinking.
Wearing this is akin to taking a stroll in a garden with dew on a summer morning. Furthermore, it’s a soft choice for those who wish to dainty summer nail art ideas but require more effort than usual.
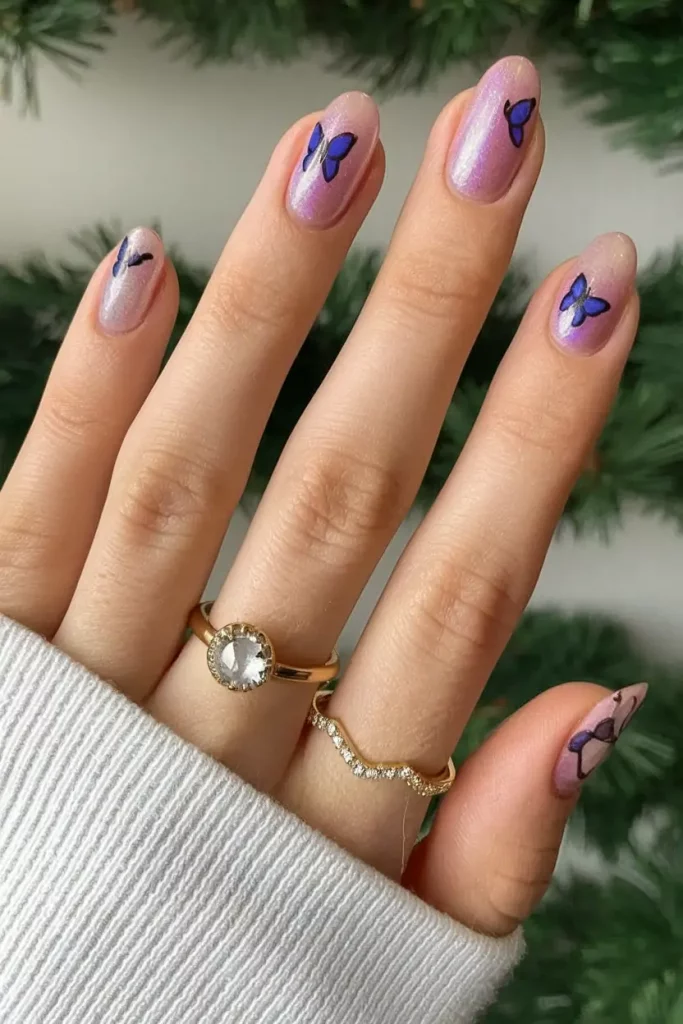
Sunset Skies & Heart Trails
The dreamy gradient mixture of lilac and bubblegum pink is truly energizing for your spirit because “I wanna fly” is not just a phrase of freedom, it is also a mindset and a lilac and bubblegum pink cotton candy sky is without a doubt magic. As It has always been stated, everything comes to he who waits and the subtle color blend and gold sparkles on this statement design I have worn this season, exclaims it all.
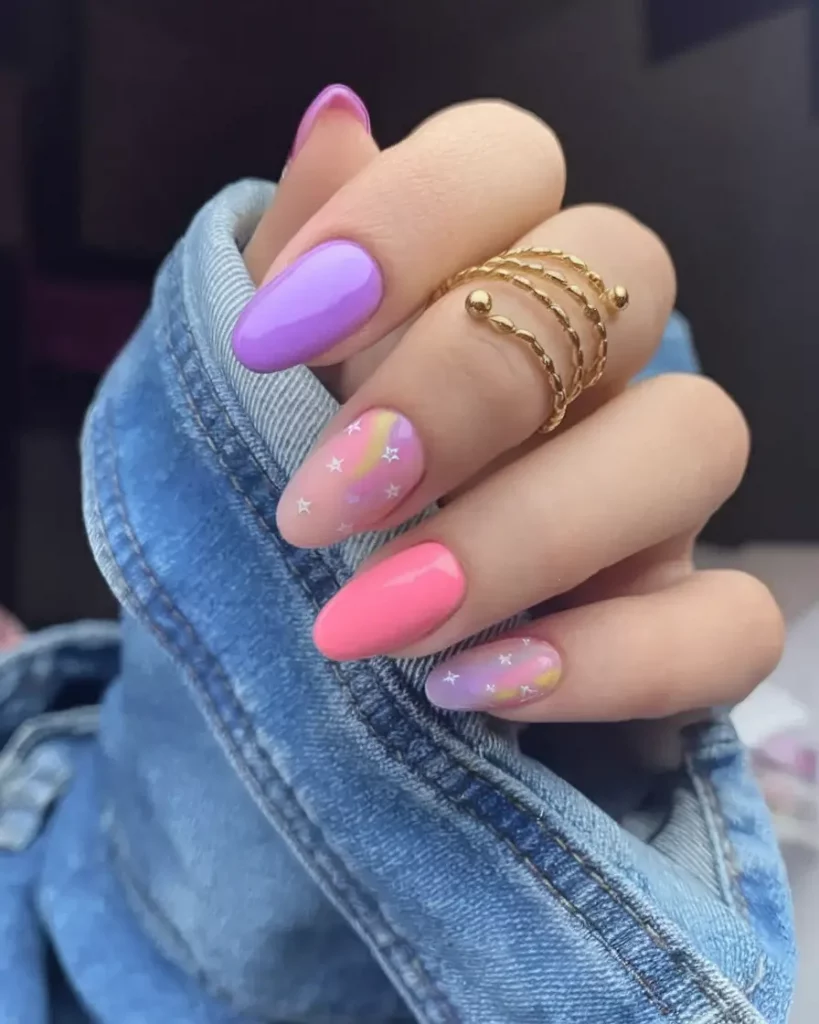
For the blend, I make sure to use, “Fiji” by Essie and “Do You Lilac It?” by OPI. Sponge blending works because it provides so many different color opportunities, so I am positive it will give you that perfect ombre appearance. For the accent nails, a nude base works best with minimalist heart decals and fine glitter lines. A smear gloss gel top coat ought to do becaues it will set the colors just right under the sun.
Use a sponge to apply your gradient and layer it until it pops. Clean the edges with a flat brush containing some acetone to give it that salon-style crispness. For the accent designs, gel liners in white can be used to add scattered hearts, or small starbursts. Once everything has dried, a top coat can be applied. Celebrity nail stylist, Gina Edwards, predicts gradient nails with soft art styling will be most popular in the summer of 2025.
This style beautifully encapsulates both daring and subtle. Perfect for a summer beach wedding or brunch at your go-to café, this design gives off the ultimate seasonal vibe.
Matte Waves & Pastel Hearts
How fun is this mix of a modern twist and Y2K throwback? Bright matte pink serves as the base, while the nude accent nails, rainbow swirls, and pastel hearts complete the look. Talk about matte Lisa Frank vibes without going into full cartoon mode—those colors are velvet dipped in pastel.
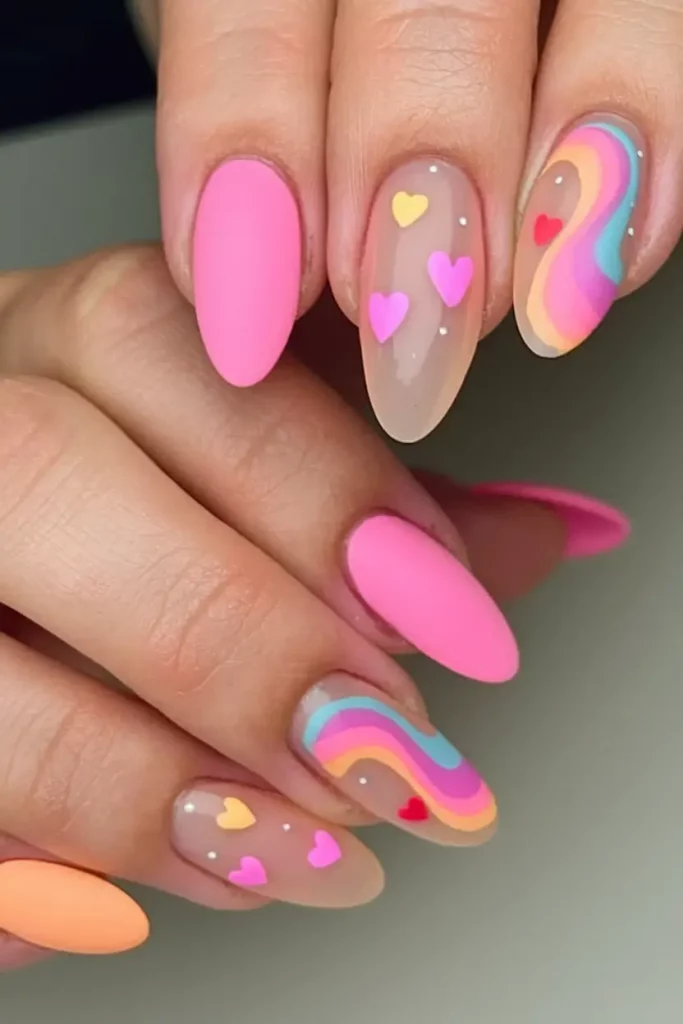
My color choices consisted of Peacci’s “Flamingo” and “Papaya” for the solids, and I crafted custom colors with a pastel gel palette for the waves and hearts. From patience to striping brushes and dotting tools, you are set to get the perfect finish. You may leave out the matte top coat, but I recommend not doing so unless gloss chic is your intended look.
Starting from the nude base, apply the bright color blocks. With a fine liner brush, start off with applying waves while layering in a side to side fashion to create movement. For the hearts, create two dots and connect them with a downward stroke. To complete the look, apply the matte of your choice top for that chilly-soft chic. I recently heard from nail artist @nailartbyqueenie that “This kind of design brings nostalgic joy and modern edge together perfectly.”
This falls perfectly under summer nail art ideas square or summer nail art ideas 2025. The vibes while wearing this on vacation are nothing short of feeling like a summer playlist, and with every motion I take, it gets even better.
Tangerine Dream with a Citrus Twist
Manicures are a must-have on the beauty agenda. Te final touch, like sprucing up your outfit with a splash of color. Getting orange nail polish feels like sipping on some fresh juice because of the jelly orange polish on half of the fingernails. Other taupe nails reveal glossy greenery holding citrus slices. It is bound to add fun and umph to your fingrs which means this contributes to the latest trends of summer nail art ideas.
If you have orange polish and a cape nude base, then for the rest of the palm, use OPI “Bare My Soul” for a solid base so you can layer with Essie “Tangerine Tease.” The slices can be tricky, but with some time you’ll either choose to make them using acrylic paint or get posters they can achieve with a super-glass gel polish that is clear like gloss.
Creating citrus nail designs is easier than it appears. With a fine-tip brush, I like to outline the basic shapes first and then add jelly polish to create depth. The seeds and leaves can be done with the help of tiny dotting tools.
People ask me if my nails are scented every time I put on this design. This playful approach on summer nails is truly mesmerizing and draws attention to even the simplest beach outfits.
Fresh Fruit Mix
Who wouldn’t like mini fruits over a nude base? This set isn’t just aesthetically pleasing, it also has a practical and chic minimalist design balance. The slices of watermelon, cherries, lemons and peaches are intricately detailed, making the set eye-catching. This is also one of the summer nail art ideas suitable for beginners, as it promotes bright colors without being overwhelming.
For my design, I use a sheer pink-toned base like Essie’s “Mademoiselle” and paint the fruit with ultra-fine detailing brushes and gel paint. If you are short on time, fruit nail decals, or stickers, are fantastic as well, as long as they are sealed with a good top coat.
Begin by shaping your nails then applying two coats of your base. Allow it to dry completely before applying the fruit details with a dotting tool or detail brush. A top coat, such as Seche Vite, will maintain its glossy finish and prevent chipping for days.
This is one of my go-to designs when I’m looking to feel a bit festive. The design is elegant and understated at the same time. It provides summer picnic vibes—minus the ants. It is definitely one of my personal favorites from this year’s simple summer nail art ideas.
Dewy Tulips
This set feels like a soft morning breeze—airy mint and ivory pastels topped with translucent dew drops and tiny yellow tulips. The vibrant tulips seamlessly blend into the refreshing dew giving the overall design a peaceful aesthetic. The design is gentle, yet it commands attention—an elegant twist on summer nail art ideas that is perfect for nature enthusiasts.
To achieve this look, I start with a watercolor wash of colors like Zoya’s “Neely” and “Jacqueline.” For the water-drop effect, I use thick layers of gel top coat cured under LED which adds a unique shine. The tulip flowers can be painted using a round brush or even a dotting tool for simpler shaping.
Shaping the domes requires builder gel and curing light is helpful for blocking any gel drippage during the curing phase of making flowers. For the petals, use white and place yellow on them thereafter to complete tiered 3D flowers.
It is as if bearing spring throughout summer while wearing this mani. The infusion of colors is gentle and reminds me of linen dresses worn during early morning vacations.
It amazes me how wonderful a mani that reflects the golden hour suns are. This design has lavender and pink ombre background with a twinking white stars. You can also add a soft yellow arc though this should not be overly boosted. Surreal but far from over the top, I’d say this is one of many amazing summer nail art ideas & designs worth pinning. Still, I recommend making this look with shimmery polishes like Play Date from Essie and Mod About You by OPI.
Starry Sunset
To create your gradient designs, patience is required. For achieving the desired gradient, begin with applying base shades, patting them, from the bottom to the top, and blending them well. For more precision while adding sparkles and stars, use a micro-brush or a toothpick. The addition of a milky top coat will make the stars have a dreamy aura.
If you’re manifesting summer magic and need nails to match, this design embodies Pinterest-core and astrology vibes. Witmshockin, I swear it complemented the sky when I wore it to the rooftop party during sunset.
Who doesn’t love a mani that mimics golden-hour skies? This design pairs lavender and pink ombré with twinkling white star accents and a soft yellow arc—subtle but cosmic. It’s whimsical, trendy, and quietly magical, making it one of the more ethereal summer nail art ideas & design worth pinning.
I suggest using polishes with a bit of shimmer like “Play Date” from Essie and “Mod About You” by OPI. Blend the colors with a sponge for a smooth gradient and paint on mini stars using a detailing pen or white stamping polish.
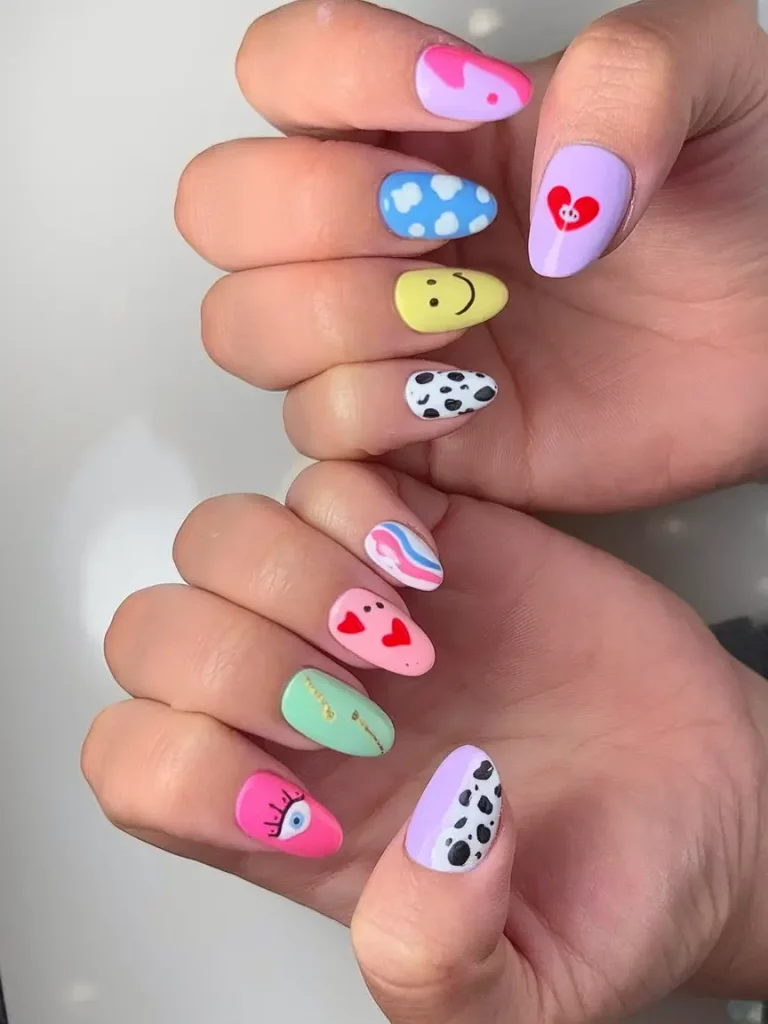
Pastel Pop and Play
This one is a combination of a sweet and a matte rainbow dream. The design is composed of a pastel swirled sunset with warm blood orange and flamingo pinks over translucent nude nails with candy heart accents. It feels like nail art from a grown up Lisa Frank. Best square and almond summer nails ar exuded through this versatile piece of art.
Making use of a rich palette of neon acrylic paints or gel polishes, transform vivid dreams into reality. Grab a fine brush and sketch the hearts, don’t forget to let every pat of color dry before adding another. For sealing your hardwork, the matte top coat from Kiara Sky is squealed by all, so you know you’re in safe hands.
Focus on each section: begin with solid color nails, and afterward, apply the negative space nails. To maintain a uniform pastel texture, I apply the matte top coat last. Small white dots can be added to imitate sparkles—this minor detail makes an enormous difference.
These nails bring back warm memories while also having a fun and cheerful vibe. They simply put a smile on my face. This design definitely shrieks poolside party. If you are collecting your own inspiration for summer beach nail art, definitely add this one to the collection. It’s nothing but happiness in a bottle of nail polish.
Emoji Carnival
This nail design is an absolute emoji explosion which includes hearts, a smiley face, clouds, cow print and even an evil eye. The pop art style to each nail is unique in it’s own way. This design embodies ‘the cool girl on summer break’ vibe and impossible effort. With the almond shape, it becomes a go-to for effortless summer nail art ideas, perfect for fans of bold designs.
You will need an assortment of gel colors, a dotting tool, as well as ultra-fine nail art brushes to achieve this look at home. For best results, apply a base color to all the nails first. Then, work on each nail individually, starting with the base coat as a matte top coat to achieve a cartoon effect. If feeling shiny, leave the top coat glossy.
Each finger resembles a sticker on your high school binder—cute, chaotic, and eye-catching all at once. Ideal for Gen Z vibes or anyone who wants to reminisce on Tumblr-core aesthetics.
Minimal Kitty Whispers
Capturing sweet little cat faces, closed eyes, and delicate lashes, this nail style looks delicate and charming adorned with white nails and fine black line art drawings. A dainty option if you’re searching for summer nail art ideas for short nails that still pack a stylish punch.
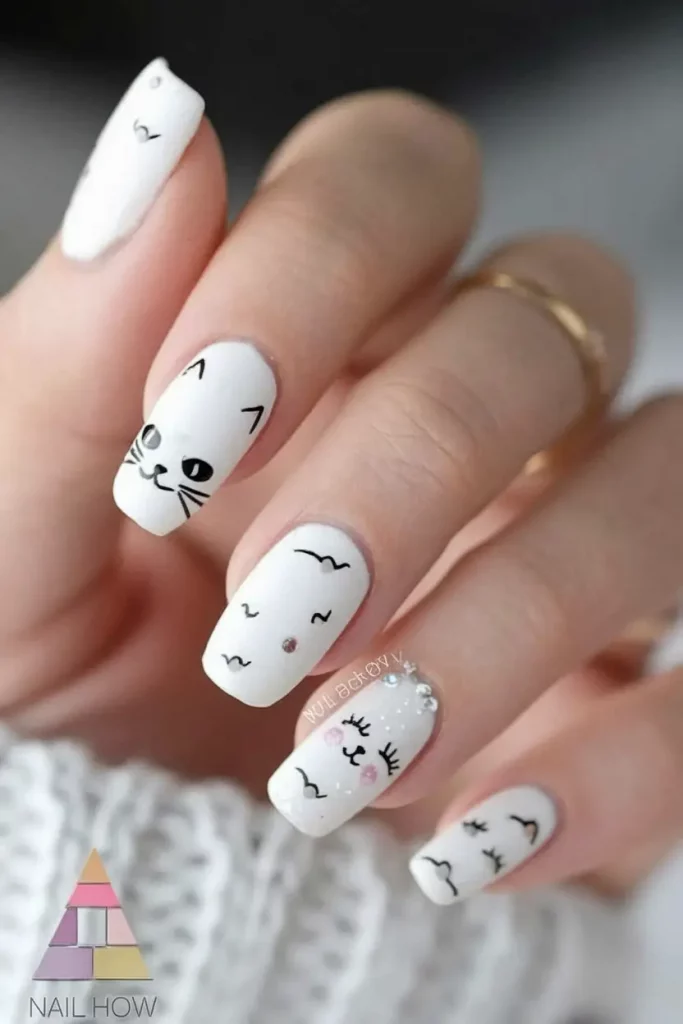
Use sheer white or soft matte white as a base, then add tiny illustrations with a black gel liner. You will need a superfine brush, as this is micro-detail work. Top everything off with a clear coat to seal the design without adding any extra bulk.
Ideal for introverted folks because these nails have just the right amount of bashfulness without being too neon. Achieves a cozy look for weekends or those matching vibes with an oversized cardigan.
Rainbow Drip Tips
This design is jaw-dropping, starting with a nude pink base and vertically rainbow tips that give the illusion of melting sherbet. It even has a subdued sprinkle of glitter. It combines classic style and current trends, and it simply screams effortless yet striking summer nail art.
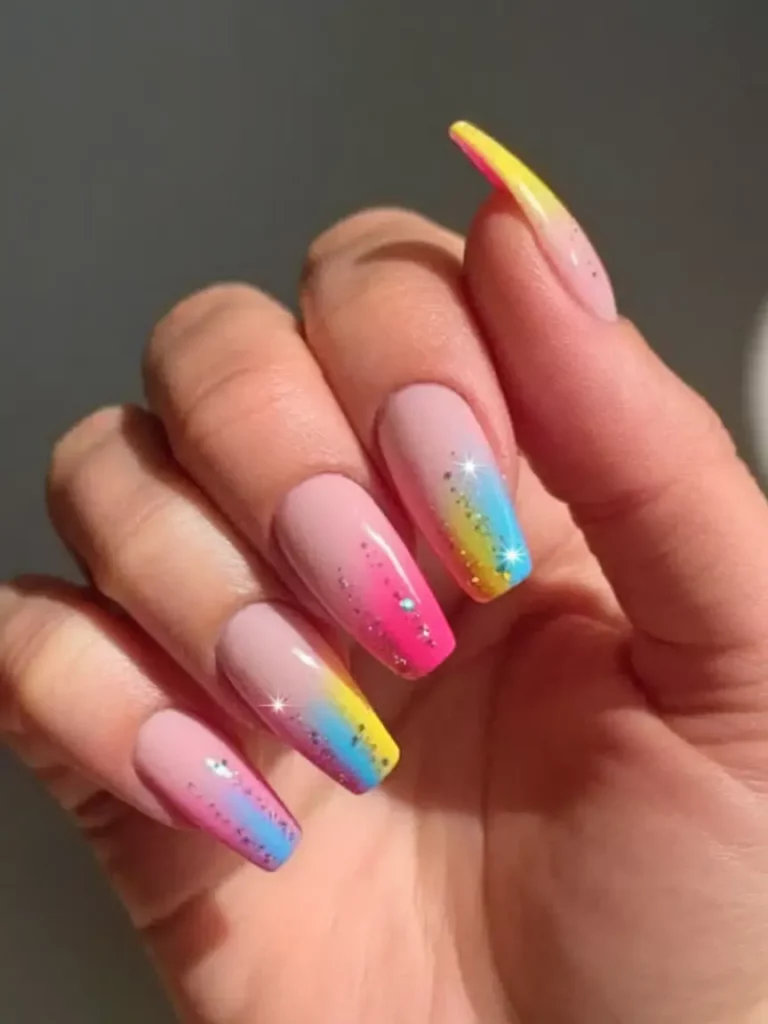
For the gradient effect, use the sponge dabbing method to apply color in rainbow order, then clean up the edges using a fine brush. Pour on the glitter topcoat for that sculpted shine. It is critical to ensure that the base is completely cured and smooth before sponging on the color.
These designs are great for long coffin or square nails, and they feel like a grown-up version of your favorite rainbow highlighters.
Candle Flame Birthday Cuties
This design is quite impressive, huh? With vivid flames and sparkly confetti, each nail looks as if it has miniature birthday candles on top. If you are looking for summer beach celebration nail art ideas, you just found it.
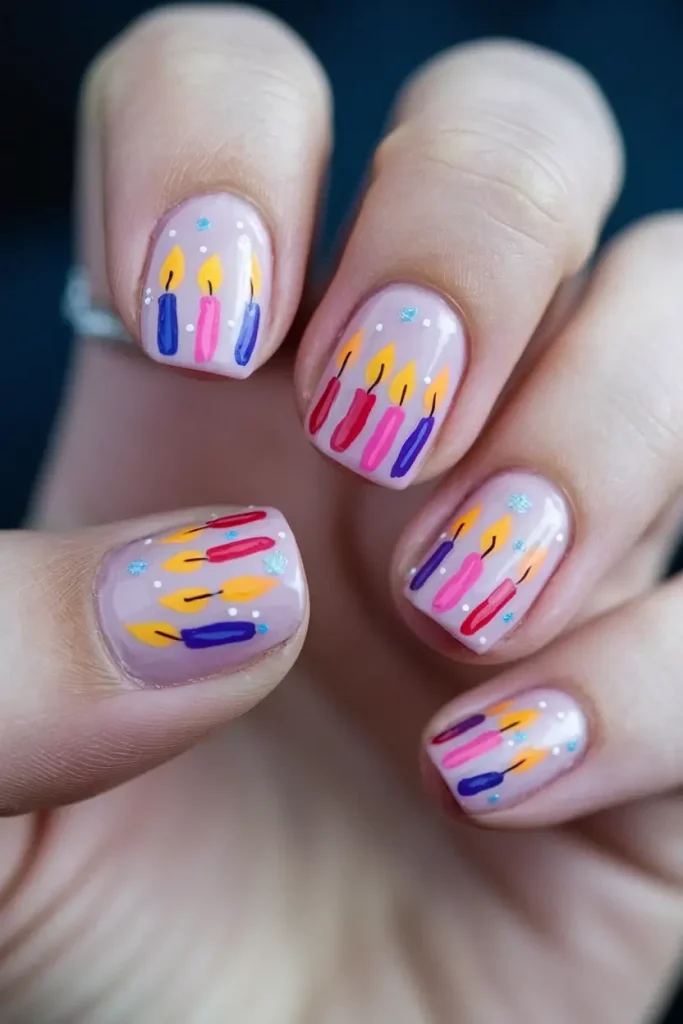
As the base, use a very light nude and for the candles, pick bold primary colors. As for the shape, draw vertical lines topped off with circles, then do a puff paint outline in black or orange to give it depth. A couple of white dots adds to the festive feeling.
These nails evoke pure delight whether it’s your true birthday or you simply wish to feel like the star of the day.
Retro Chevron Waves
This zig-zaggy matte chevron set is themed chic for all lovers of positive accurate lines and blocky bold colors. It features purple, teal, yellow, and even lime green layered into clean arrows. This is chevron erasurf, lte ultra modern and totally retro at the same time. A fantastic option for summer nail art ideas & design lovers who crave symmetry.
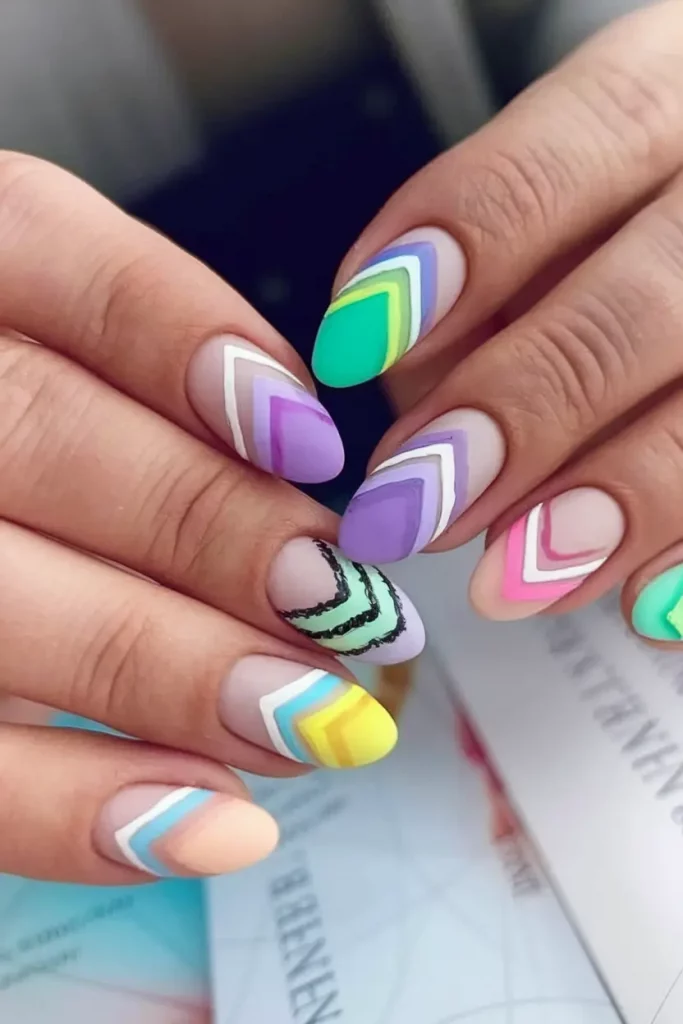
Employ nail striping tape or meticulously paint your way to perfection using a thin brush. A matte top coat further enhances the 70s vibes. Mix textures if you wish, adding one glitter accent like the picture where you want to put something for contrast.
These nails grab attention and they would look fabulous holding a beach spritz or posing for oversized sunglasses selfies.
Rainbow Daisies: Fresh & Whimsical
Bathe in the bliss this design brings. Multi-colored stripes of the warm spectrum that are red, orange, yellow, and green are divided by the blue and purple horizontal bands, where miniature 3D daisies rest on the strips like they are taking in rays of the sun. The background is a transparent nude which keeps the design fresh and understated whilst letting the vivid colors shine.
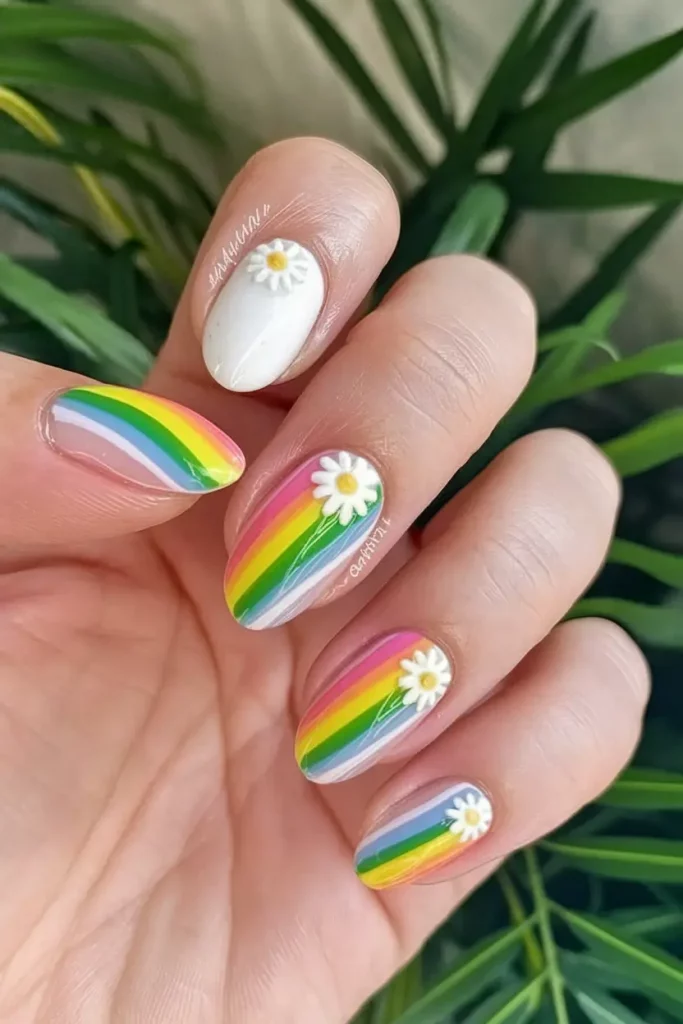
Inspiration: Get the daisies in gel and begin with a clear base, following that apply a pre-made nude base to keep the design lightweight. This is the base of the spring picnic nails. For arachnid charms get the scoop on dotting and shaping white gel polish. Onc you have shaped the daisy cure afterwards use a glossy top coat to finish.
Ideal apply to summer short natural almond nails as a take off of nynth’s signature lore designs. Cheery, sunning and easy going.
Confetti Twisters
This style radiates summertime bliss. Taking a white background twister rings are enfolded with raised gel polka dots colored in every shae of the rainbow, giving a confetti vibe. The highlight of this design is how striking each nail is to another. Spring: This brings joy to anyone venturing in during the time.
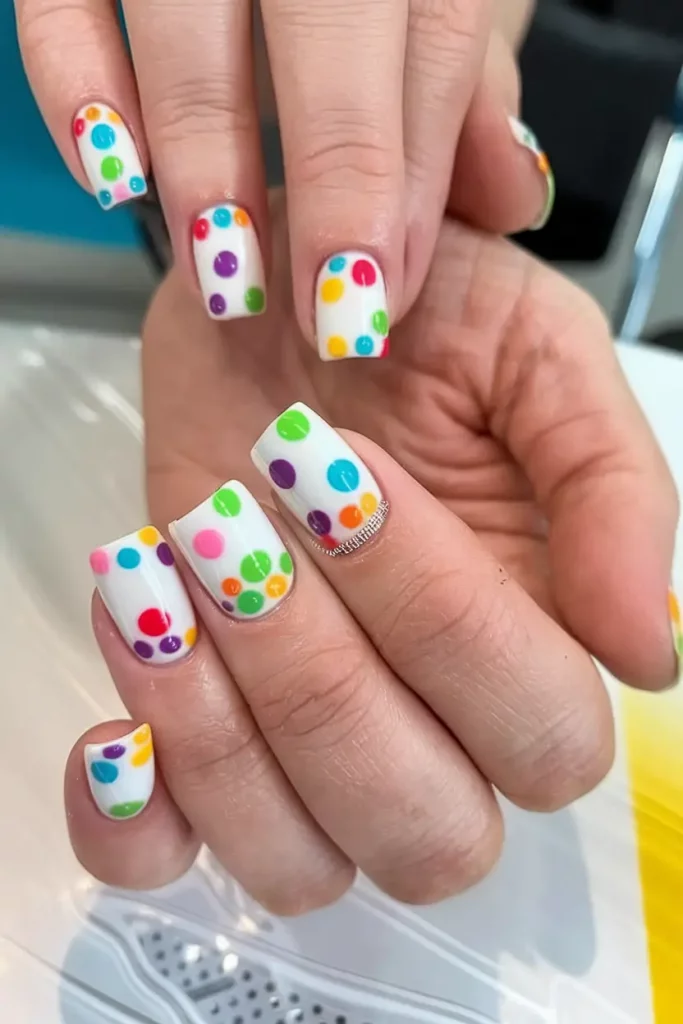
What sets this design aside is the 3D texture. Use various sizes of dotting tools along with thick builder gel or brightly colored gel polish to form each raised circle. To prevent spreading or bleeding, allow each layer to fully cure prior to adding the next.
This style is best suited for square or short coffin nails, and it’s an amazing choice for summer party or festival nails. Its virtually calling to be displayed in the sunlight.
Cosmic Pop Art
We’re entering a graphic, pop-art-style universe here. Bold sections of neon coral, yellow, aqua, and jet black are divided with contrasting striping and overlaid with random splatters of black and white paint. It’s edgy, loud, and immensely stylish.
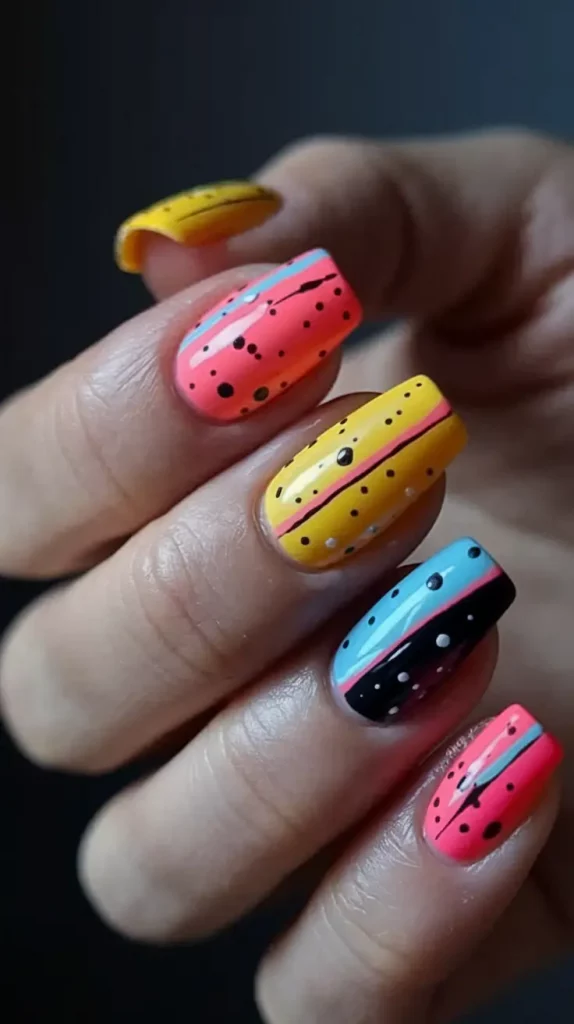
For this design, it works best if you paint each nail in one solid color first. Use striping tape or a steady hand for the straight-line separations. Flick black and white gel polish too using a stiff-bristled brush (or even a toothbrush!) for that Jackson Pollock-style splatter.
Ideal for the wearer looking for intense statement summer nails. These are the nails to wear to rooftop parties or to DJ your own beach party.
Conclusion
These nail art ideas for summer swim past soft dreamy florals in contrast to bold neons, and off into a realm of fruit-filled allure. They do a lot more than just looking appealing, acting as a glimpse of various seasons all packed onto your fingertips. Mark your favorites, share them with your nail artist, or do try it yourself! No matter which shade you fancy for summer, there truly is a technique for every mood in here.